Showing posts with label annotated games. Show all posts

Taking Care of Business

My friend John Julian always reminded me that high rated players must take care of business in the early rounds of a Swiss tournament. That is, players in the upper quarter will be paired against players that they are expected to beat. They need to do so. In a two-day Swiss, the tough games come on the second day.

Taking care of business is not always easy.

I have had a cold this past week, and today the congestion resulted in a persistent headache. It was not terribly severe, but it refused to leave. Combine the headache with with my penchant for photographing as many players as possible during the early rounds of Spokane's weekend tournaments, and I was in a bit of trouble before I became properly focused on my first round game.

I recall a conversation with my opponent between rounds during last year's Collyer Memorial. He drove up from Oregon to participate in the event. This game was the first time that we played.

My opponent opted for the Ponziani, which had been my new weapon last year. It made the beginning of the game psychologically difficult. I spent six minutes on my third move.

Beverly,Jacob (1462) -- Stripes,James (1872) [C44]
Collyer Memorial Spokane (1), 28.02.2015

1.e4 e5 2.Nf3 Nc6 3.c3 f5

I think that Paul Morphy might have played this move were he in my seat.

4.exf5 e4 5.Qe2N

Black to move

5...Be7?

I have learned playing the Ponziani that opponents often freak out, so, I freaked out and blundered a second pawn after intentionally sacrificing a first.

5...d5 seems best.

6.Qxe4 Nf6 7.Qc2 d5 8.Bb5 0–0 9.Bxc6

9.d4 was better.

9...bxc6 10.0–0

Black to move

10...Ne4

I was rushing to win back one of the pawns. Morphy, on the other hand, would find the best squares for his pieces.

11.d3

As expected, and best.

11...Nd6 12.Nd4

Here, I became alert to many threatened knight forks that interfered with my plans.

12...Qd7 13.Nd2

13.g4

13...Nxf5 14.Nxf5 Qxf5 15.Nf3 Bd6 16.Be3

16.Nd4 was better.

Black to move

16...Qg6

I don't know how I missed  16...Qh5 as that was part of my intent behind 15...Bd6. I spent seven minutes on Bd6 and two on Qg6.

17.Nh4 (17.g3 Rxf3) 17...Qxh4-+.

I considered 16...Qg4 17.Nd4 (17.h3? Qh5 18.Ne1 Qe5 19.g3 Bxh3-+).

17.Ne1

17.Nh4 Qh5 18.g3 Bh3-+.

17...c5 18.f4 Bf5 19.Qb3 c6 20.Rd1 Bg4

White to move

At this point in the game, I had used a full hour to my opponent's 25 minutes.

21.Rd2 Rfe8 22.Nc2 Rab8 23.Qa4

Black to move

23...Bf8

I spent fifteen minutes on this move.

23...Rxb2 occupied much of my long think. I was uncertain, and so played a move that seemed safer. 24.Qxc6 Rxc2 25.Qxd5+ Qe6 was not my likely move, although it is the only one in the position that leaves Black with an advantage.

24.b3 Rb7 25.Qa5 Bf5 26.Bxc5

Black to move

26...Bxd3

26...Rb5 was suggested by Darren Russell during the post-mortem. It is the computer's top choice.

27.Rfd1

27.f5 Bxf5 28.Nd4

27...Bxc2–+ 

Finally, I am winning. At this point I had 37 minutes left on the clock.

28.Rc1 Be4 29.c4 Bd6 30.g3 Bxf4 31.Rf1

Black to move

31....Bxd2 

I didn't even consider 31...Bxg3 which leads to checkmate in seven moves.

 32.Qxd2 Rf7 33.Re1 Rf3 34.Bf2 Ref8 35.cxd5 cxd5 36.Bc5

Black to move

36...Rxg3+

I found the checkmate in three. Indeed, I had been trying for it for several moves prior.

37.hxg3 Qxg3+ 0–1

In round two I had a more difficult game against the Caro-Kann that seemed roughly equal well into the middlegame. As I was organizing my forces to create attacking chances, I overlooked the danger of my opponent's counterplay. Then, he moved his queen to the wrong square, allowing me to exchange a rook for two minor pieces and end his prospects for attack.

With my bye in round three, I start round four tomorrow morning with 2 1/2, which is what I expect in weekend Swiss.

Schulten -- Morphy 1857

Game of the Week

My training regimen varies. I use several tactics training resources, both print and electronic. I go through many games most weeks. I study classic games and sometimes follow Grandmaster games as they develop in real time (see "So -- Vachier-Lagrave"). Endgames are a regular element of study, too. During the early weeks of a correspondence game, I often go through many games in the opening that is developing. For one particular game currently in progress, I went through every game published in Chess Informant in that particular variation (over 100 games). I use Chess.com's Chess Mentor.

As chess study bounces about from one topic to another, I usually have an ongoing project that represents a constant: something I return to every few days over many months. For the present, I am working through the 59 games in GM_RAM: Essential Grandmaster Knowledge (2000) by Rashid Ziyatdinov. One game per week.* I started in December 2014. If I persist to the end, this project will conclude in early 2016.

Ziyatdinov's seventh game is a Paul Morphy miniature. His opponent, Johann Schulten, opted for the King's Gambit, which Morphy met with the Falkbeer Counter Gambit. The Falkbeer is one of Black's most promising lines against the King's Gambit. My own performance on the White side of the Falkbeer suggest plenty of room for improvement. As Schulten in this game, I often find myself in a bit of trouble rather quickly.

Although Ziyatdinov's 59 games are presented as the source for 120 middle game positions, errors in the opening quickly demand my attention. Each morning for the past several days, I have spend a little time going through this game. But until today, I did not attend to Morphy's concluding combination. Rather, Schulten's errors large and small in the first twelve moves have captured my attention.

Schulten,J -- Morphy,Paul  [C32]
New York, 1857

1.e4 e5 2.f4 d5 3.exd5 e4 4.Nc3

4.d3 seems more precise. It is both more popular than 4.Nc3 and scores better for White. In my own games with White, 4.Nc3 has been my choice more often.

4...Nf6 5.d3

5.Qe2 is an interesting possibility.

5...Bb4 6.Bd2 e3 7.Bxe3

Black to move

Black has a lot of compensation for the two pawns. Black has seized the initiative.

7...0–0

7...Nxd5 does not seem as strong. 8.Bd2 Bxc3 9.Bxc3 (9.bxc3) 9...Nxc3 10.bxc3 Qf6 11.Qd2.

8.Bd2 Bxc3 9.bxc3

9.Bxc3 seems playable 9...Re8+ 10.Be2 Nxd5 11.Qd2.

9...Re8+ 10.Be2 Bg4 11.c4

11.Kf2

11.h3 Qxd5 12.Kf2 Qc5+ 13.Kg3 Nh5+ 14.Kh2 Bxe2 15.Nxe2 Nc6 16.Nd4 Nf6 17.Nxc6 Qxc6 18.c4 Rad8 19.Re1 Rxe1 20.Bxe1 Re8 21.Bh4 Re6 22.Qd2 Rd6 23.Re1 Qxc4 24.Bxf6 gxf6 25.Re8+ Kg7 26.Qe3 1–0 Pridorozhni,A (2524) -- Karpov,A (2330) Khanty-Mansiysk 2008

11...c6

White to move

12.dxc6??

This move is the most critical error of the game.

12.h3 might be the only move. Black retains an advantage, but White's position is playable.

12...Nxc6 13.Kf1 Rxe2!–+ 14.Nxe2 Nd4 15.Qb1 Bxe2+ 16.Kf2 

16.Kg1 is worse 16...Nxc2 17.h3 (17.Qxc2 Qd4+ 18.Be3 Qxe3#) 17...Qxd3 18.Qc1 Ne4 (18...Nxa1).

16...Ng4+ 17.Kg1 Nf3+ 18.gxf3 Qd4+ 19.Kg2 Qf2+ 20.Kh3 Qxf3+ 21.Kh4 

The game score ends here. Maybe Morphy pointed out the checkmate in three.

21.Kh4 Ne3 22.Rg1 Nf5+ 23.Kg5 Qh5#

0–1


*My week begins on Wednesday due to teaching a college history course that meets 6:00-10:00pm on Tuesdays. This course end in mid-February, but has set the training schedule for the year.

Meek -- Morphy 1855

While a student at Spring Hill College on the outskirts of Mobile, Alabama, Paul Morphy traveled the twelve miles into Mobile a couple of times. During one of these visits, he played three games with Judge Alexander Beaufort Meek, who was serving as judge of the probate court there. Morphy won. Meek and Morphy would again square off at the First American Chess Congress two years later

One of the games played in Mobile was selected by Rashid Ziyatdinov for inclusion in GM-RAM: Essential Grandmaster Knowledge and is the source for three "essential middlegame positions" therein. I am going through the 59 games in Ziyatdinov's book at the rate on one per week. The tag, "Game of the Week 2015," links to my comments on these games.


Meek,Alexander Beaufort -- Morphy,Paul  [C44]
Mobile, 01.03.1855

1.e4 e5 2.Nf3 Nc6 3.d4 exd4 4.Bc4 Bc5

Two years later, Morphy would play 4...Nf6 5.e5 d5 6.Bb5

(6.exf6 dxc4 7.fxg7 Bxg7 appears good for Black)

6...Ne4 7.Nxd4 Bd7 8.Nxc6 bxc6 9.Bd3 Bc5 10.Bxe4 Qh4 11.Qe2 dxe4 12.Be3 Bg4 13.Qc4 Bxe3 14.g3 Qd8 15.fxe3

(15.Qxc6+ Bd7 16.Qc3 Bb6-+)

15...Qd1+ 16.Kf2 Qf3+ 17.Kg1 Bh3 18.Qxc6+ Kf8 19.Qxa8+ Ke7 0–1 Lichtenhein,T -- Morphy,P, New York 1857.

5.Ng5

Black to move
GM-RAM Position 147
This position occurs in a dubious and uncommon gambit line. Why does it merit inclusion in Ziyatdinov's 120 "essential middlegame positions"?

Perhaps the answer stems from the forcing tactics. An error by Black here could lead to a rapid collapse.

5...Nh6

5...Ne5 scores poorly 6.Nxf7

(6.Bxf7+ Nxf7 7.Nxf7 Bb4+ 8.c3 dxc3 9.bxc3 Bxc3+ 10.Nxc3 Kxf7 11.Qd5+ Kf8 12.Ba3+ d6 13.e5 Qg5, Cochrane,J -- Deschapelles,A, Paris 1821. White clearly has the better game and won in 31 moves.)

6...Nxf7 7.Bxf7+ Kxf7 8.Qh5+ g6 9.Qxc5 d6 10.Qxd4, NN -- Alekhine,A, Kislovodsk 1907/EXT 2007. Black has dropped a pawn because he has an undeveloped knight instead of one on c6. Nonetheless, Alekhine won in 21 moves.

6.Nxf7

6.Bxf7+ leads to the same position 6...Nxf7 7.Nxf7 Kxf7 8.Qh5+ g6 9.Qxc5.

6.Qh5!? also merits study. There are pitfalls for Black after any inaccurate moves.

6...Nxf7 7.Bxf7+ Kxf7 8.Qh5+ g6 9.Qxc5 d6

White to move

Black's king looks exposed, but White is ill-prepared to attack. Rather, Black seizes the initiative. It is my understanding that Ziyatdinov expects the aspiring student to instantly perceive this position as one possible consequence of that in Position 147.

10.Qb5

10.Qc4+ Be6 11.Qd3 with a slight edge for Black.

10...Re8 11.Qb3+

11.0–0 seems better than Meek's move.

a) 11...a6 12.Qb3+ Kg7 13.Qd3;

b) 11...Re5 12.Qd3 Qe7 13.Nd2 Kg7 14.f4 Rh5

b1) 15.b4!? a6 (15...Qh4 16.h3) 16.Bb2 Qh4 (16...Nxb4 17.Qxd4+ Kf7 18.Qxb4+-) 17.h3.

b2) 15.Nf3 Qf6 16.Bd2 Bg4 17.c3 Bxf3 18.Rxf3 Re8 and drawn in 57 moves, Forgacs,A (2256) -- Piroska,I (2153), Dunaujvaros 2011

c) 11...Rxe4 12.Qd5+ Re6

11...d5 12.f3

12.0–0 still seems sensible.

12...Na5 13.Qd3

13.Qa3

13...dxe4 14.fxe4 Qh4+ 15.g3

15.Kf1 Rxe4 16.Qg3 Qg4 Black has the upper hand.

Black to move

15...Rxe4+

Morphy's most important inaccuracy.

15...Qxe4+! 16.Qxe4 (16.Kd2 Qg2+ 17.Kd1 Bg4+ 18.Qf3+ Bxf3#) 16...Rxe4+ 17.Kf2–+.

16.Kf2

16.Kd1 Bg4+ 17.Kd2 Qg5+ 18.Qe3 Qxe3#.

16.Be3!! Qg4 with a slight advantage for Black.

16...Qe7 17.Nd2

17.Bg5 seems better. 17...Qe5 18.Nd2 Bf5 19.Nxe4 Bxe4 Black has the upper hand.

17...Re3–+ 18.Qb5

18.Qxd4 Re2+ 19.Kg1 Bh3 20.Qd5+ Kf8 21.Nf1 Rg2+ 22.Qxg2 Bxg2 23.Kxg2–+.

18...c6 19.Qf1

19.Qxa5 is worse. 19...Re2+ 20.Kg1 (20.Kf3 Qe3#) 20...Qe3+ 21.Kf1 Qf2#.

Black to move
GM-RAM Position 148
19...Bh3 20.Qd1

20.Qxh3 Re2+ 21.Kf3 (21.Kf1 Re1+ 22.Kg2 Qe2#) 21...Qe3+ 22.Kg4 h5+ 23.Qxh5 gxh5+ (23...Qe6+ 24.Kh4 gxh5 25.Rf1+ Kg6 26.Rf6+ Qxf6+ 27.Kh3 Qf5+ 28.Kh4 Qg4#) 24.Kh4 Kg6 25.Ne4 Qxe4+ 26.Bf4 Rxh2+ 27.Rxh2 Qf5 and mate next move.

Black to move
GM-RAM Diagram 149
It may seem odd that Ziyatdinov offers two diagrams separated by a single move. However, the first is justified because the offer of a decoy sacrifice leads to a forced checkmate in nine moves. In the second, Black's victory is certain with correct play even though checkmate is not imminent.

20...Rf8 21.Nf3 Ke8 22.Bd2

22.Bxe3 Qxe3#.

22.Re1 Rfxf3+ 23.Qxf3 Rxf3+ 24.Kxf3 Qxe1–+.

22...Qe4 23.Kg1 Rexf3 24.Qxf3 Rxf3 25.Re1 Rf1+

25...Qxe1+ 26.Bxe1 Rf1#.

26.Rxf1 Qg2# 0–1

Planning, Time, Strategy

Lesson of the Week

Some of my advanced students this week are going through a game and annotations concerned with planning. The game was annotated by the winner and included in a chapter that he added to a book that he translated into English: Paul Keres, and Alexander Kotov, The Art of the Middlegame, trans. H. Golombek (1964). The annotations below are as they appear in the book, except that I have converted descriptive notation to algebraic, and have omitted some passages.

The diagram appears in the book. I start with it, asking students how they would play as White. Then, we go through the game from the beginning. Because I think Golombek's comments are instructive, I add very little.


Golombek,Harry -- Puig Pulido,Pedro [A65]
Varna ol (Men) fin-B Varna (7), 1962
[Golombek,Harry]

This game is an example of "fits-and-starts policy": "start on one plan, switch over to another that seems more attractive, and then, when it is too late, try to return to the original plan."

1.d4 Nf6 2.c4 g6 3.Nc3 Bg7 4.e4 0–0 5.f3 c5

Already the nature of Black's plan has defined itself. He is prepared to allow White a certain pawn preponderance in the center provided that in return he is able to concentrate on a counter-attack on the queen's side: an excellent plan that has proved its worth in many a modern game and one that would work here too--always provided Black sticks to his plan.

6.d5 d6 7.Bd3 e6 8.Nge2 exd5 9.cxd5

Now White's plan is clear. He intends to use his pawn majority in the center to make a thrust there; hence he recaptures with the c-pawn rather than the e-pawn so as to have in reserve the eventual advance of e4-e5.

9...Na6 10.0–0 Nb4

The first change in plan. Black, lured away by the possibility of attacking White's king bishop, neglects to follow the logical line of counter-attack on the queen's side. He should have played 10...Nc7 11.-- with the idea  11...a6 12.-- Rb8 13.-- b5.

11.Bc4 Re8 12.a3 Na6 13.Bg5

White has not only mere development in mind with this move. If Black drives away the bishop by h6 and g5 then he will have weakened his King's side and driven the bishop to a post from which it can aid the central pawn thrust of e5. There is also a more insidious notion in the move--it is designed to induce Black to change his plan yet once more.

13...Qb6

And Black does exactly this; he forms a fresh plan with the idea of unpinning himself and then manuevering the queen knight to d7 so as to hold back the advance of White's e-pawn. That this plan utterly fails is due to the waste of time caused by Black's constant change of plan.

14.Qd2 Nb8 15.Ng3 Nbd7 16.f4 h6 17.Bh4 Ng4 18.Rae1

All part of the plan of central advance.

18...Ngf6 19.Kh1 Nh7

White to move


With this move Black deems that he has adequately guarded e5 and prevented White's central advance. But now comes the logical follow-up of White's plan.

20.e5! g5 

Desperation; but what else can Black do?

20...dxe5 21.d6 -- 22.Nd5.

21.fxg5 hxg5 22.e6! 

A good illustration of White's theme--the central pawn advance. The plan has won through and it only remains to gather the fruits.

22...f6 23.Bb5 gxh4 24.Nf5 Bf8 25.exd7 Rxe1 26.Rxe1 Bxd7 27.Bxd7 Rd8 28.Be6+ Kh8 29.Nxh4 1-0

Black resigns. A case of too many plans spoiling the broth.


Anderssen -- Staunton 1851

The fifth match game between Adolf Anderssen and Howard Staunton at the 1851 London International Chess Tournament is the source for three essential middlegame positions in Rashid Ziyatdinov, GM-RAM: Essential Grandmaster Knowledge (2000). I have been going through this game for the past few days and now sense that I am ready to post my initial annotations. This game and the one preceding it in Ziyatdinov's text have often slowed my efforts to work through the other games in the text. Staunton's play seems a little amateurish.

Anderssen,Adolf -- Staunton,Howard [C01]
London knockout London (3.5), 1851

1.e4 e6 2.d4 g6?!

This second move is not how the French Defense is played today.

3.Bd3 Bg7

Black assaults d4, attempting to weaken White's center. In this case, at least, Staunton's positional sense is consistent with twenty-first century practice.

4.Be3 c5 5.c3 cxd4 6.cxd4

Black to move

6...Qb6

The fork at the heart of Black's assault on d4. After the same initial five moves, Anderssen, playing Black, opted to continue his development, rather than win a pawn. 6...Nc6 7.Ne2 Nge7 8.0–0 0–0 9.Nbc3 d5 10.e5 f6 1–0 Morphy,P -- Anderssen,A Paris 1858 Morphy won in 35 moves.

7.Ne2 Qxb2 

Black has won a pawn at the cost of moblization of his forces.

8.Nbc3 Qb6 9.Rc1

This move is "well conceived", according to Staunton. Better than the more obvious Rb1, he states. Stockfish disagrees.

9.Rb1 Qa5 10.Bd2 (10.Rb5?! Qd8) 10...Nc6 11.Nb5 Qd8 and a clear advantage for White.

9...Na6

9...Ne7 10.d5 Qb4

10.Nb5 Bf8

10...Ne7 seems better to me. Even so, White already has a nice game.

11.d5 The threat that Staunton identified as rendering Bf8 necessary. 11...Qd8 12.Nd6+ (12.d6 Nc6) 12...Kf8 13.Nd4 -- with the idea of 14.Qf3, attacking the weakness of f7.

11.0–0 d6 12.d5 Qa5 13.Bd4 e5 14.Bc3 Qd8

White to move
GM-RAM Diagram 140
Only one of Black's pieces is off its starting square. All of White's pieces have moved, except the queen. Although down a pawn, White's pieces are in action.

See "To Know a Position."

15.f4‚ f6 16.fxe5 fxe5

Black's king cannot escape the center, but how will White break through to exploit its vulnerability?

17.Qa4

Beginning the assault on d6 with a threatened discovery.

17...Bd7

Pinning the knight prevents a discovered check, but reduces the defenders of d6.

18.Bb4 Nh6 19.Kh1

White avoids forks that defend d6.

19...Nf7

This position before White's move 20 is GM-RAM diagram 141.

20.Qa3

Black to move

20...Nc5

"Child's play. Throwing away his most important Pawn for nothing!" (Staunton)

I do not agree with Staunton's assessment here.

a) 20...Qe7

Hangs onto a material advantage, but leaves Black's position in shambles.

21.Nxd6+ Nxd6 22.Rxf8+! Qxf8 23.Bxd6 White's position is very strong.

b) 20...Qb8

Fails to bolster the pawn.

b1) 21.Rxf7!? Kxf7 22.Bxd6 (22.Nxd6+ Kg8 23.Bxa6 bxa6 24.Ng1 with compensation for the material) 22...Bxd6 23.Nxd6+ Kg7 24.Nxb7! Rc8 25.Qe7+ Kg8 26.Rb1+-

b2) 21.Rf6! is the computer's choice.

c) 20...Be7

Black's best choice, although it does not retain the pawn.

21.Nxd6+ (21.Bxd6? 0–0) 21...Nxd6 22.Bxd6 Bxd6 23.Qxd6 Qe7 24.Rf6 and White's position seems better.

21.Nxd6+

Better is 21.Bxc5 dxc5 22.d6 and White must regain the pawn with interest. 22...Nxd6 23.Qxc5 (23.Rxf8+!? Kxf8 24.Nxd6‚) 23...Nxb5 24.Qxe5+ Qe7 25.Qxh8 White is up the exchange and Black's king remains stuck in the center.

21...Bxd6 22.Bxc5 Bxc5 23.Qxc5 Qe7 24.Qc7 Nd6 25.Qa5 h5 26.Rc7 Rf8 27.Rfc1 a6

White to move
GM-RAM Diagram 142
28.Nd4! Rc8

28...exd4? Staunton observed that taking the knight would be an error. 29.e5 Nf7

(29...Qxe5 30.Bxg6+ Nf7 31.Re1 White will win material of greater value than the knight ... and the assault on Black's king will continue.)

30.e6 Nd6 31.exd7+ Kf7 (31...Kd8 32.Rc8+ Kxd7 33.Qc7#) 32.d8N+ Rfxd8 33.Rf1+ Nf5 34.Rxe7+ Kxe7 35.Bxf5+-.

29.Ne6

"At this crisis, the game, having lasted several hours, was postponed by mutual consent until the next day." Howard Staunton

Staunton notes that White has a clear advantage.

29...Rxc7 30.Rxc7 Rf7 31.Qb6

Fiddling around is search of the most precise moves, I looked through these variations. Neither of them seem superior to Anderssen's choice.

31.Qc3 Nb5 32.Bxb5 axb5 33.h3.
31.Nc5 Qf6 32.h3

31...Rf6 32.h3 g5 33.Qb2 Nb5 34.Bxb5 axb5 35.Qxe5

Black to move

White finally has a material advantage.

35...h4 36.Rxb7 Rf1+ 37.Kh2 Qf6 

White to move

White has a mate in six.

38.Rb8+

The game ends more rapidly after 38.Qb8+ Kf7 39.Rxd7+ Qe7

(39...Kg6 40.Qg8+ Kh5 41.Qh7+ Qh6 42.Ng7#)

40.Qf8+ Kg6 41.Qxe7 Rh1+ 42.Kxh1 b4 43.Qxg5#.

38...Ke7

a) 38...Bc8 39.Rxc8+ Kf7

a1) 39...Kd7 40.Qc7#.
a2) 39...Ke7 40.d6+ Kd7 41.Rc7+ Ke8 42.Ng7+ Kf8 43.Qe8#.

40.Rf8+ Kg6 41.Rxf6+ Rxf6 42.Qxg5+ Kf7 43.Qg7+ Ke8 44.Qxf6 b4 45.Qf8+ Kd7 46.Qd8#.

b) 38...Kf7 39.Rf8+ Kg6 40.Rxf6+ Rxf6

b1) 40...Kh5 41.Ng7#.

b2) 40...Kh7 41.Qxg5 Rh1+ 42.Kxh1 Bxe6 43.Rh6#.

41.Qxg5+ Kf7 42.Qg7+ Ke8 43.d6 Rxe6 (43...Bxe6 44.Qe7#) 44.Qg8#.

39.d6+ Kf7 40.Rf8+ Kg6 41.Rxf6+ Rxf6 42.Qxg5+ Kf7 43.Qg7+ Kxe6 44.Qe7# 1–0


Lesson of the Week

American Thanksgiving cut out most of my school clubs and half of my private lessons this week. Even so, I still met with my beginning students at one school and a few advanced students in individual lessons.

My advanced students are all going through the games Paul Morphy played in the First American Chess Congress, 1857. These games show Morphy's play during a period of rapid improvement. The contrast between his approach to the game and his first two opponents at the Congress illustrate the concept of development that Morphy understood well and that others (see "Modern School" tag at the bottom of this post) would articulate in the decades following. His games in the final two rounds show how he was able to triumph against more stubborn opposition.

I showed an online blitz game to my beginning students that offered several examples of two- and three-move combinations that were played or that could have been played. Any young player who can consistently recognize two-move combinations will quickly become a contender for trophies in scholastic tournaments.

During the moments when such tactics were possible in this game, I asked the students to find the tactic.

Internet Opponent (1639) -- Stripes,J (1702) [C02]
Live Chess Chess.com, 25.11.2014

1.e4 e6 2.d4 d5 3.e5 c5 4.c3 Nc6 5.Nf3 Bd7 6.Bd3 Nge7

I play an old line.

6...Rc8 is currently hot, and quite sensible.
6...cxd4 is the most common reply.
6...Qb6 is fine.

7.Bb5? 

Black to move


This common and frequent beginner's error presents Black with an opportunity to win a pawn by force.

7.0–0 would have been a good move.

7...cxd4

The immediate 7...Nxe5 is better.

8.cxd4

8.Bxc6 bxc6 9.cxd4 Nf5 and Black has an advantage, even though he failed to take the free pawn.

8...Nxe5 9.Nxe5

9.Bxd7+ Nxd7 Black is a pawn ahead, as in the game.

9...Bxb5 10.Nc3 Ba6??

White to move

Black needed to play 10...Qb6 or 10...Bc6.

11.Ne2?

White continues with clumsy play.

11.Qa4+ exploits Black's blunder. 11...Nc6 12.Nxc6 Qd7 13.Ne5 Qxa4 14.Nxa4+- and White is a piece ahead with a nice position.

11...Nf5??

Black clearly does not perceive his own vulnerability.

12.0–0

12.Qa4+ Ke7= 13.Bd2 Bxe2 14.Kxe2 with equal chances.

12...Bxe2 13.Qxe2 Nxd4

Black has won two pawns.

14.Qg4 Nc6 15.Bg5??

Black to move

15...Nxe5–+ 16.Qa4+

16.Bxd8 Nxg4–+.

16...Qd7 17.Qd4 Nc6 0–1

McDonnell -- La Bourdonnais 1834

First Match, Game Fourteen

The ChessBase database contains 110 games of Alexander McDonnell (1798-1835). He was described shortly after his death as "the best English player," although he was born in Belfast (see image). Of these games, 85 were played against a single opponent, Louis-Charles Mahé de La Bourdonnais (1795-1840). Their match, or rather series of six matches, was the first match between two masters in which the games were recorded and published.

Title Page from Walker (click on image to emlarge)
William Greenwood Walker, secretary to the Westminster Chess Club, recorded the games and published them in A Selection of Games at Chess (London: 1836), a book now widely available free through Google Books. Walker's text includes many games played at odds which are absent from the ChessBase database.

As near as I have verified so far, the games in the ChessBase database are sequenced in the same order as this book. However, game 14 is not in Walker's text. Rather, he offers, "The Fourteenth game is not preserved, it was not a good game" (155).

Chess Skills blog is following this historic match that took place 180 years ago. I am studying the games with some reference to databases, limited reference to the comments of other players, and no reference to engine evaluations. My analysis certainly contains errors. My principle goal is personal training in tactics, strategy, and analytic skill. This personal study journal, however, may be of interest to other chess enthusiasts. Indeed, comments posted on some of my previous posts confirms that it is.

There is a very good book on this historic match: Cary Utterberg, De la Bourdonnais versus McDonnell, 1834 (2005). Utterberg offers a narrative of the historical milieu, a compendium of comments on the games by other chess writers, and his own analysis. Of particular interest, perhaps, is Utterberg's summation of the state of opening theory when the match took place. Unfortunately, I do not have a copy of Utterberg's book, but base my understanding of its contents and merits upon Utterberg's website and reviews o which it links. Utterberg's own critique of certain errors in the text, which was published as a ChessCafe article ("Errata and Punishment") serves to convince me of his skills as an historian.

My post, "Morning Coffee," contains my analysis of game 13. My series on the match begins with "Three Fighting Draws." Each post on this match contains a link to the next in the series. At my current pace, it will require many months longer than I anticipated when I determined to work through all of McDonnell's game. I may well own a copy of Utterberg's book before I finish.

According to Walker, the first match consisted of 21 games. Draws did not count towards this total. There were four draws in the first match.

McDonnell,Alexander -- De Labourdonnais,Louis Charles Mahe [B21]*
London m1 London (14), 1834

1.e4 c5 2.f4 e6 3.Nf3 d5 4.e5 Nc6 5.c3 f6 6.Na3 Nh6 7.Nc2 Qb6 8.d4 Bd7

Bourdonnais makes small refinements to his opening play.

White to move

9.Ne3

McDonnell continues to repeat errors that brought pain in previous games. This move weakens d4.

9.Bd3 0–0–0 10.0–0 Be8 11.Qe1 c4 12.Be2 Bg6 13.Ne3 Nf5 14.b3 cxb3 15.axb3 Qxb3 16.Bd1 Qb6 17.exf6 gxf6 18.Ng4 Bg7 19.Qxe6+ Kb8 20.Nxf6 Ncxd4 21.Nxd4 Bxf6 22.Qxb6 axb6 ½–½ Prosviriakov,V (2307)--Rozanov,P (2304) Moscow 2013

9...cxd4 10.cxd4 Bb4+ 11.Kf2

I commented on this king hike in "De La Bourdonnais Evens the Score."

11.Bd2 also leads to the loss of a pawn. 11...Nxd4 12.Nxd4 Qxd4 13.Bxb4 Qxb4+ 14.Qd2 Qxd2+ 15.Kxd2 0–0

11...0–0 12.Kg3 fxe5 13.fxe5

To McDonnell's credit, however, he is not yet down a pawn. Perhaps, he considered his own refinements an improvement.

13...Be8

The bishop aims at h5 and thence f3. Black increases the pressure on d4.

White to move

14.Kh3

14.b3 seems worse 14...Bc3 15.Rb1 and d4 will fall.
14.a3 offers prospects of securing White's center 14...Be7 15.b4 Bh5 16.Bb2 Bxf3 17.gxf3

14...Bh5 15.g4 Bg6 16.Bg2 Be4

When the knight on f3 disappears, the d-pawn will fall.

17.g5 Nf5 18.Nxf5 Rxf5 19.Be3

The d4 pawn gains another protector.

19...Bxf3 20.Bxf3

Black to move

20...Nxe5

The knight was also protecting e5.

21.Bg4 

21.dxe5 Qxe3 22.Rf1 Raf8 23.Kg2 Rxg5+ 24.Kh1 Black's advantage seems clear.

21...Nxg4 22.Qxg4 Raf8 23.Rhg1 Bd6

White to move

24.Bc1

24.Raf1 is worse 24...Rxf1 25.Qxe6+ Kh8 26.Rxf1 Rxf1
24.Rg3 seems to be Whiute's most stubborn reply 24...Bxg3 25.hxg3 Qxb2 26.Rg1

24...Rf3+ 25.Kh4 

25.Rg3 Bxg3 26.hxg3 Rf1

25...R8f4 0–1

McDonnell went on to lose the next four games before finally winning a long battle. See "That Pin of f7" for game 15.


*In "Two Losses" I noted that C00 should be the ECO code. In fact, one of the games with this opening appears in the Encyclopedia of Chess Openings at that code. The B21 that appears is preserved as I find it in the ChessBase database.

Faltering Against the Dutch

My game against Jeremy Krasin did not go as planned. I did not win. In the Spokane Contenders Tournament, I had White against Jeremy. I also had White in 2012, winning that game and the event. At the end of the 2012 Spokane Contenders, I reached my highest ever USCF rating of 1982.

Stripes,James (1917) -- Krasin,Jeremy (1882) [A90]
Spokane Contenders Spokane, 24.07.2014

1.d4 e6!

Krasin offers me the White side of the French. As everyone in Spokane knows, the French is my main Black weapon against 1.e4. It might be expected that I prefer to avoid playing the White side. In fact, I play the White side with some frequency as I play 1.e4 as often as I play 1.d4.

If Krasin intends to play the Dutch Defense, this move has the virtue of preventing me from Playing the Raphael Dutch and the Staunton Gambit. My experience with the Raphael is well known by those who have observed the Spokane scene the past few years, and Krasin has played against it in several blitz games. He also lost to the Staunton Gambit in the 2012 Spokane Contenders.

2.g3 f5

Indeed, the Dutch was his plan.

3.c4 Nf6 4.Nc3

4.Bg2 is more accurate.

4...c6

White to move

Can White play 5.d5? I thought about it, and we looked at it after the game. I thought that 5...Bb4 would be Black's best response.

5.Bg2

5.d5  was played by a master against an expert. That game continued 5...Bb4 6.Bg2 0–0 7.Bd2 e5 8.Nf3 Qe7 9.0–0 b6 10.a3 Bd6 11.e4 cxd5 12.exd5 e4 13.Nd4 Ne8 14.Qe2 Na6 15.b4 Be5 16.Be3 Qf6 17.Rad1 Bb7 18.Ncb5 Nd6 19.f4 exf3 20.Nxf3 1–0 Neubauer,M (2433)--Maia,J (2128) Rio de Janeiro 2011

5...d5 6.cxd5?!

My move scores poorly in the database. I played it to avoid the loss of the c-pawn--a beginner's error. If I'm unwilling to suffer the temporary loss of that pawn, I should not be playing the Queen's Gambit.

6.Nh3 appears to be most popular among strong players.
6.Nf3 is the most popular move in the database overall It has been played by Etienne Bacrot and Mihai Suba.
6.Bf4 has been played by Ivan Sokolov on more than one occasion.

6...exd5 7.Bg5

I would like to trade my dark-squared bishop for Black's knight or dark-squared bishop. But, I have some ambivalence concerning the trade for the knight.

7...Be7

I was feeling here that Black already had a slight advantage.

8.Nf3 0–0 9.Qc2

Black to move

9...Na6 10.a3

Preventing Nb4 is an exercise in chasing phantoms. But if a3 is a necessary part of my planned minority attack, then perhaps it is not a wasted move.

10...Nc7 11.0–0 Ne6 12.Bd2 Ne4

It is clear that Black has the iniative.

13.b4 Bf6 14.e3 g5

White to move

I spent a lot of time on this position and was not happy with any of my plans. I decided that I needed to secure f4 as a possible knight outpost, while also protecting my d-pawn.

I did consider 15.Nxe4 fxe4 16.Ne5 but thought that I would end up with a pawn on e5 that was hard to protect. As it turned out, I had such a pawn in any case, and I underestimated its dynamic potential.

15.Ne2 Bd7 16.a4 b6 17.Ne5 Bxe5 18.dxe5 Rc8 19.Bc1!

In retrospect, from the end of the game, this bishop proved to be valuable.

19...g4 20.a5

20.Rd1 should have been considered.

20...Qe8 21.Nf4 N6g5

White to move

22.f3?

22.Bb2!
22.axb6! axb6 23.Bb2 and White may gain the iniative. The pawn on e5 sticks in the middle of Black's forces, preventing many arrangements of his pieces that might be useful for exploiting the apparent weaknesses around the White king. My fears about Nf3+ and a Black pawn taking up residence on f3 in preparation for Black's queen penetrating along the h-file appear unfounded.

22...gxf3 23.Bxf3 Nxf3+ 24.Rxf3 Ng5 25.Rf2 Qxe5 26.Qb2

Black to move

26...Qxb2

During the game, I thought 26...Qe4 might continue to cause me grief. Krasin and I looked at a few lines following this move during the post-mortem.

27.Bxb2 b5 28.Kg2 Rce8 29.Bd4 a6 30.Rc1 Ne6 31.Nxe6

31.Nd3 is a move preferred by Stockfish.

31...Rxe6 32.Rf4 Re4 33.Rcf1 Kf7 

White to move

34.Rxe4 dxe4 35.Rd1 Ke8 36.Bc5 Rf6 37.Kf2 Rg6 38.Rd6 Rxd6 ½–½

It is clear that I need more weapons against the classical Dutch. The Raphael is insufficient.

After this game, my only chance to play in the City Championship was to win my last two games and also get help from David Dussome, who would need at least a draw against Michael Cambareri. Alas, I lost to Cambareri the next day, giving him clear first in the Contenders Tournament. Had he then beaten Dussome, his chances of going over 2000 with his rating was quite good. He lost to Dussome. Dussome thus beat the top two rated players in this event.

I have one game remaining in the event.

Target e6

It has been more than six months since I started working through every game in Chess Informant 113. It is a slow process that I do not pursue every day. Nonetheless, I am finding it instructive. When I finish, I plan to repeat the process through an older issue of Informant. The plan is to work through issues that I possess in both electronic and print versions. I play through the games on my computer screen, but use the print version to record light notes and to serve as a bookmark.

This position arises as a variation in Informant 113/142, Lalic -- Straka, Sunningdale 2011. It strikes me as an almost elementary example of how a player of the White pieces employs checkmate threats against h7 to weaken Black's castled position and wreck Black's central pawn structure. The pawn on e6 is the target.

White to move

Bogdan Lalic gives the line 14.Ng5 g6 15.Qh3 h5 16.Nxe6+-.
Detail: Target e6

Living Dangerously

The Alekhine-Chatard Attack against the French Defense can lead to wild play. In an online blitz game this morning, I had the Black side of a terribly uncomfortable position due to a gross error on move nine. I survived as my opponent and I managed to answer error with error. He made the last significant error and I won.

Nomen Nescio -- Stripes,J [C14]
blitz Some Random Chess Site, 29.03.2014

1.e4 e6 2.d4 d5 3.Nc3 Nf6 4.Bg5 Be7 5.e5 Nfd7 6.h4 a6

I opted for the Maroczy variation.

White to move

7.Qg4 Bxg5 8.hxg5 c5 9.g6 h6??

9...f5 was the correct move.

10.gxf7+ Kxf7 11.Bd3 Nf8 12.dxc5

Black to move

Black has a very unpleasant position.

12...Nc6 13.Nf3 Bd7 14.0–0–0

14.Nh4 is easily refuted by 14...Nxe5.

14...Qa5 15.Ng5+ Kg8

The only move, although White's advantage is still very nearly decisive. In a master's hands, it would be so.

White to move

16.Qh5

16.Nxd5! exd5 17.Qf3 hxg5 (17...Nd8 18.Qxd5+ Nde6 19.Qxb7) 18.Rxh8+ Kxh8 19.Qf7 and White has a clear advantage.

16...Nxe5 17.f4 Nxd3+?

17...Qxc5 18.Kb1 Be8 19.Qh3 Nxd3 with a slight advantage for White.

18.Rxd3 Be8 19.Qh3 Bg6

White to move

20.Rg3?

An error that nevertheless contains a threat which both players managed to overlook.

20.Nxe6 Bxd3 21.cxd3±.

20...Bf5?? 21.Qh5

21.Nxe6 Bxe6 (21...Bxh3 22.Rxg7#) 22.f5+-.

21...Bg6 22.Qh4

22.Nxe6 was still possible, and the queen still immune.

22...Bf5 23.Nf3

Black to move

23...Qd8

23...Qxc5 was better with a slight advantage to Black.

24.Qh5 Qf6 25.Ne5 Rc8 

Black appears close to solving his problems.

26.Ne2 Rxc5

White to move

Both sides seem to have even chances. The Black king is finally as secure as White's.

27.Nd4??

27.c3 or 27.Nd3 was necessary to mitigate the vulnerability of the White king. Having been attacking most of the game, however, White may have found the shift to defensive moves difficult.

27...Bxc2 28.Nxc2 Qxf4+–+ 29.Kb1 Qxg3 30.Qf7+ Kh7 31.Nf3 Qg6 

White to move

32.Qxb7

32.Qxg6+ Nxg6–+

32...Qxc2+ White resigns 0–1

Mating Net

This position arises in the annotations to Nunn -- Korchnoi, Luzerne 1985 (Chess Informant 40/360). In the game itself, Nunn refused Korchnoi's offer of a bishop on a4. This position is one of several that might have arisen if he had taken the bishop.

Black to move

Korchnoi offers the interesting line leading to checkmate: 30...Rxd3 31. Rxd3 Nb6+ 32.Ka5 Nc4+ 33.Ka4 b5#.

In the game itself, Nunn resigned after Black's move 34.
Detail: Mating Net

Losing my Virginity with the Ponziani

In the second round of the Collyer Memorial tournament yesterday, I played the Ponziani for the first time in a standard game. My prior experience with the opening had been limited to a few games of online blitz the previous three days, one game against a beginner in a chess class that I teach, and against the winner of Spokane Chess Club's winter championship in Friday's blitz tournament. In that game, I had a nice position but then hung my queen.

I have looked over a few Grandmaster games in the past few days. My interest in the opening was stimulated a year ago when Magnus Carlsen played it against Pentala Harikrishna in the 2013 Tata Steel tournament, and then had the Black side in his game against Hou Yifan. The latter was mentioned on this blog while it was taking place. More recently, I have been looking through the games of Rezső Charousek and spent some time this week looking at a miniature that he lost to Geza Marozcy. Here is that game with a few comments.

Geza Maroczy -- Rudolf Rezso Charousek [C44]
Match Budapest (2), 19.04.1895

1.e4 e5 2.Nf3 Nc6 3.c3 d5 4.Qa4 f6 5.Bb5 Nge7 6.exd5 Qxd5 7.d4 exd4

7...Bd7
7...Bg4

8.cxd4 Bd7 9.Nc3 Qf5 10.0–0 Nc8??

10...0–0–0 11.Be3 a6 12.Be2 g5 13.Qd1 Nd5 14.Nxd5 Qxd5 15.b3 g4 16.Bc4 Qh5 17.Nd2 Bd6 18.g3 f5 19.f4 b5 20.Bd5 Rhe8 21.Re1 Bb4 22.Rc1 Ne7 23.Bh1 Qf7 24.a3 Ba5 25.b4 Bb6 26.Qc2 Nd5 27.Qb3 Be6 28.Bxd5 Bxd5 29.Qc3 Bb7 30.Qb3 Qd7 31.Nf1 Bxd4 32.Red1 Bxe3+ 33.Nxe3 Qe7 34.Nd5 Bxd5 35.Rxd5 Rxd5 36.Qc2 Qe3+ 37.Kh1 Qe4+ 38.Qxe4 Rxe4 39.Rc2 Red4 0–1 Kelling,F -- Gyles,A, Auckland 1914

11.d5 Nb6 12.dxc6 Nxa4 13.cxd7+ Kd8 14.Bxa4 c6 15.Rd1 Bc5 16.Be3 Bb6 17.Rd6 Kc7 18.Rad1 Rad8 19.Bxb6+ 1–0

For the past few days, I have been contemplating deploying the Ponziani in a tournament game. Self-doubt has been a deterrent. Having been pleased with my play in round one, I decided to play it.

Stripes,James (1899) -- Lombardi,George (1429) [C44]
Collyer Memorial Spokane (2), 22.02.2014

1.e4 e5 2.Nf3

I briefly considered 2.f4, which would have been Charousek's move.

2...Nc6 3.c3

I also considered the Spanish and the Italian, both of which I have played in many games over the years.

3...Nf6

Black has several choices, but this move is most popular.

4.d4 Nxe4

I had looked at games with this move, but forget the main lines. I was now completely on my own tactical and positional understanding without any database memory. To be forced to create something new early, and to force one's opponent to do the same is a principal appeal of the Ponziani.

5.d5

I found the main line.

Black to move

5...Nxf2!?

I was busy taking photos of the players for the Spokane Chess Club when my opponent made this astounding move. Returning to my own board, I was certain the move was an error. Nonetheless, my king did become exposed and I had several alternate lines to consider.

6.Kxf2 Bc5+ 7.Be3 Bxe3+ 8.Kxe3

Black to move

My king's position reminds me of a conversation I had the previous evening concerning the Steinitz Gambit, where Steinitz himself marched his king forward to e3 in some King's Gambit games. The prompt was the second game that John Donaldson showed during his lecture. In that game, White's king stepped up to d2 to connect the rooks, then moved to the third rank. Eventually, it took up position on f2 where it helped keep Black's rogue queen trapped.

8...e4 9.dxc6

I spent six minutes on this move (compared to four for the whole game prior). Most of that time was spent contemplating my next move.

9...exf3 10.Qxf3

The materialistic 10.cxd7+ struck me as being a bit too helpful to Black's mobilization. With a vulnerable king, that seemed a foolish course. A computer can work out the tactics and may favor the material gain. I may check this game with an engine after posting these annotations.

10...0–0 11.Bd3 dxc6

White to move

12.Rd1?!

This set-up of a cheap tactic invites trouble. I seemed to be daring my opponent to find a way to skewer my queen to get at the rook. Perhaps Re1 puts the rook on a better square. I also contemplated Nd2.

12...Re8+

Somehow I overlooked this zwischenzug to set up the skewer.

13.Kf2 Qh4+ 14.Kg1 Bg4 15.Qf4

A strong chess player would have found this pin before playing 12.Rd1, and then assessed the consequences of Black's choices.

Black to move 

15...Re1+

15...g5! looked dangerous to me. 16.Bxh7+ Kxh7 17.Qxf7+ Kh8 and I would seriously consider bailing out of this game with a draw.

My opponent chose a forcing line that kept me from burning much clock time contemplating alternatives. It appeared there were none.

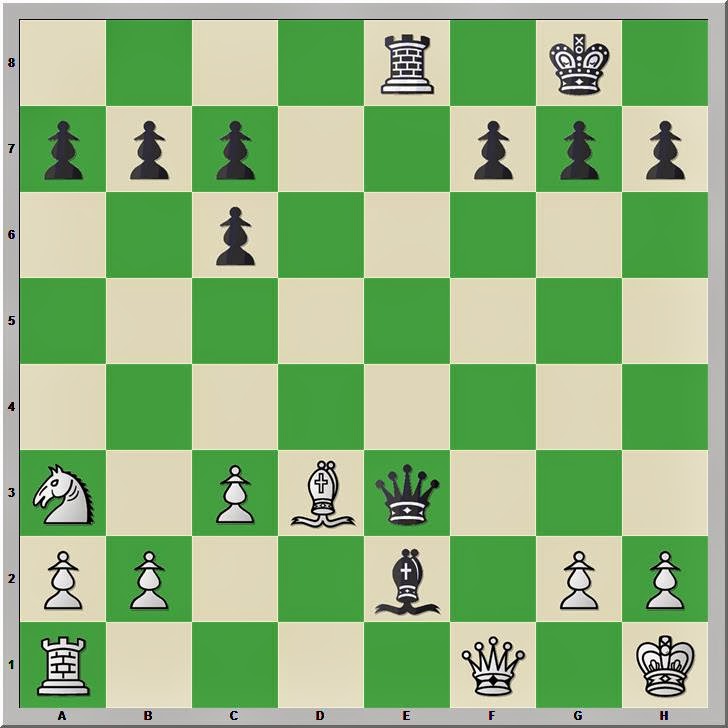
16.Rxe1 Qxe1+ 17.Qf1 Qe3+ 18.Kh1 Re8 19.Na3 Be2

My opponent used ten minutes deciding upon this move, and I had already decided to force the queens off the board with the bishops. The clock showed 1:32 remaining for me and 1:06 for my opponent. Our time control was 1:55 for the game plus a five second delay.

White to move

20.Qxe2 Qxe2 21.Bxe2 Rxe2 22.Rb1?

22.Nc4 must be better.

22...b5 23.Kg1 f5

White to move

24.Rd1

My seven minutes on this move was my longest think of the game. I should have spent a few of these minutes on move 22.

24...Kf7

The critical line that I examined was 24...Rxb2 25.Rd8+ Kf7 26.Rd7+ Kf3

The king could consider e8 and e6, too, as I'm not interested in the kingside pawns just yet.

27.Rxc7 Rxa2 28.Rxa7 with the idea of 29.Nxb5 if the rook remains on the a-file.

A version of this line is still possible after 24...Kf7, but is more likely advantageous for White, or so I thought during the game.

25.Rd7+ Re7

My opponent makes my job easier. At this point, my opponent from the previous round stopped by and looked at the game. He smiled because in our postgame analysis, we had played out a variation where I had a knight against a superior number of pawns. He, too, had sacrificed a knight for two pawns and an attack.

26.Rxe7+ Kxe7 27.Nc2

Black to move

27...g5?

Black needed to address the threatened fork with 27...c5 or 27...Kd6.

28.Nd4 Kf6 29.Nxc6 a6 30.Kf2?

The immediate 30.Nb4 was decisive.

30...h5 31.Nb4

Black to move

Another fork is coming.

31...a5 32.Nd5+ 1–0

I am pleased with the result.

Five players finished day one with 3.0 and with my third round bye, I am one of three with 2.5. This morning, I have a stronger opponent.

Older Post ►
 

Copyright 2011 Chess 2 Skills is proudly powered by blogger.com