Showing posts with label Philidor position. Show all posts

Lesson of the Week

Essentials of Rook Endings

My primary chess club had been divided into groups meeting on different days by age in years past. This year the division was changed to one based on skill. Consequently, my beginning* group on Tuesdays receives different instruction than the advanced group on Thursdays. Members of my in-school chess class and those who have contracted with me for individual lessons will get one or another of these lessons when appropriate.

The beginning group this week is working on recognizing checkmate. Interested parents may contact me to recieve a copy of the Checkmate in One exercise they will be working through over the next several weeks. I created a set of 48 positions from actual play. In every position, there is a possible checkmate on the move. My beginning group worked through the first six this week.

The advanced group is working through developing plans and correctly evaluating a series of positions that arose, or could have arisen, in one of my online games. My game ended in a textbook draw that my opponent insisted upon playing out. Along the way, we both missed clear winning chances during the course of a rook ending.

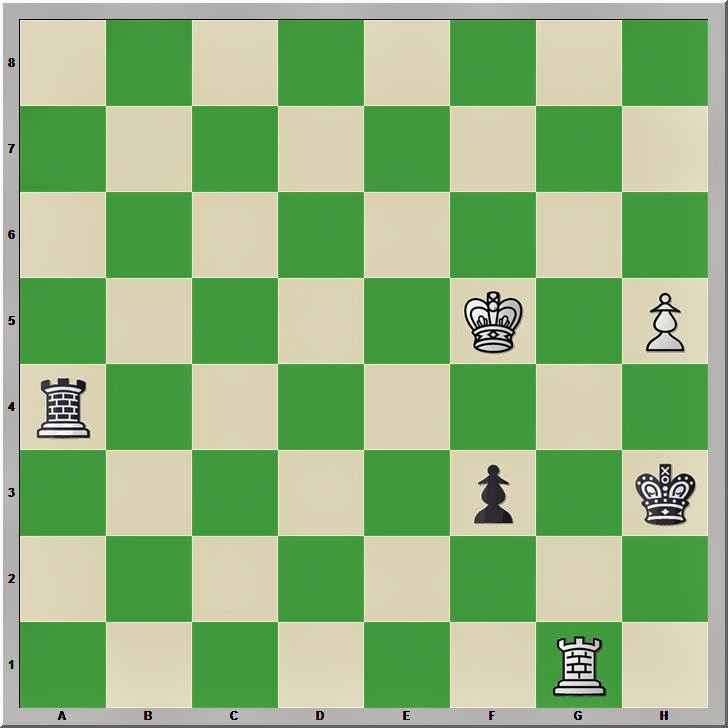
The first position occured near the end of the game. White recognizes that the position has reached the textbook Philidor Position that he had been aiming at for the past few moves.

White to move

White draws by occupying the third rank with his rook. The game continued 67.Ra3+ Kd4 68.Ke1 e3. Now that Black has advanced the pawn, White resorts to checks from the rear. Black cannot escape these checks and also maintain the pawn.

69.Ra8 Ke4 70.Re8+ and the game went on another twelve moves with White continuously checking the Black king.

The second instructive position comes from the moment when Black missed a win.

Black to move

After 54.Ra4+, Black played 54...Kd5. 54...Kd3! on the other hand would have facilitated the advance of the e-pawn and victory.

In the third instructive position for this week, White missed a chance for a clear advantage.

White to move

Black has just played 42...f5? White played 43.c4 and later let the game slip further away. However, he might have played 43.h4!

After 43.h4, Black's best chance requires the sacrifice of a pawn. 43...f4 44.Rxf4 Rb5+ 45.Kc4 and White has a clear advantage, albeit not necessarily a winning advantage.

There are many interesting positions that arise after 43.h4! Kd7?

One that is part of my lesson plan arises after the continuation 44.Rf4 Kc6 45.a4 Kd6 46.c4 Kc6 47.a5! b5

White to move

White's best move appears to be 48.d5! A possible line is 48...exd5 49.cxb5+ axb5 50.a6!

Either the a-pawn will promote, or all of both sides' pawns on the a- through e-files will be liquidated and the White king will march over to nab the trapped rook.


*Beginning and advanced are fuzzy terms in the chess world. From the perspective of a super-Grandmaster, everyone under 2000 Elo is a beginner. That definition includes me. For purposes of my after school chess club for elementary age children, advanced players are those who have qualified for the Washington State Elementary Chess Championship. Qualification each year requires scoring 3/5 or better in a qualifying tournament.

Transition to Philidor

The position below arose in Bologan -- Erdos, Sibenik 2011. The opening and early middle game appears in Chess Informant 113/113 stopping at a point where White, a pawn ahead, has only one move to avoid checkmate. Informant gives the evaluation that Black has compensation for the material.

Black to move

My analysis engine favors 40...exd5, which my eye likes because the White king appears cut off from the passed d-pawn. Even so, White's pawn majority should lure the Black rook to the a- or b-file.

Stockfish DD offers: 40...exd5 41.Kg3 Kxf6 42.b4 d4 43.a4 h5 44.Rb1 Ke5 45.b5

Black to move
Analysis Diagram
45...axb5 leads to a drawn queen ending. The engine favors 45...d3. That, too, leads to a draw although it is less elementary.

In the game, Viktor Erdos opted for 40...Rxd5.

The game continued 41.Re4 Kxf6 42.Ra4 a5 43.b4 axb4 44.Rxb4 Rd2+ 45.Kg3 Rxa2

White to move

White has only one move that holds the draw.

46.Rf4+

Can the Black king find shelter from the checks? Erdos sought refuge on e8, but h8 was also possible. Best play appears to lead to a draw in either case.

46...Kg6 47.Rg4+ Kf7 48.Rf4+ Ke8

White to move

49.Rf6! Ra3+ 50.Kg2 Ke7 51.Rh6 Kd6 52.Rxh7 Kd5 53.Kf2 e5

White to move

White has achieved a Philidor Position with the Black pieces one rank further back.

54.Rh4 e4 55.Rh8 1/2-1/2

More Rook Ending Tragicomedies

Thanks to the need to effectively teach the Lucena and Philidor rook endgame positions to a strong young chess player, I have been using my database to review my own games. My OTB (over the board games) reveal some degree of skill, but errors in blitz expose weaknesses in my intuitive understanding.

Blitz can reinforce bad habits, but it may also be useful for diagnosing and correcting those habits.

Black to move

I threw away a decisive advantage with 57...gxh3. This game was played in April 2014.

Black to move

53...Kf4 preserves winning chances, but I played 53...g4?? to reach a dead drawn ending.


The Good News

Despite these many failings, my database reveals an abundance of games in which I was able to convert a Lucena or or similar position.

This one from the Free Internet Chess Server (FICS) in February 2014 shows that I missed the best line, but found a wholly adequate solution nonetheless.

White to move

67.Rf6+ (67.Rb8 was best) 67...Kg3 68.b7 Rb6 69.Kc4 Rb1 70.Kc5 Kg4 71.Kc6 Kg5 72.Kc7 Rc1+ 73.Kb8 Rb1 74.Rc7 Kf6 75.Kc8 Re1 76.b8Q Re8+ 77.Kb7 Rxb8 78.Kxb8 and my opponent opted not to test how quickly I could deliver checkmate with a rook and king against his lone monarch.

I also avoided a trap in this finish from March 2013 on Chess.com. Then I saw a trap that was not there.

White to move

47.Kc6 Rf2 48.Kc5 Rc2+ 49.Kb4 Kc7 50.Ka3 Rc3 51.Kxb2 Rxb3+ 52.Kxb3. Game drawn.


Philidor Position: Historical Note

The Philidor Position in rook endings is one where the weaker side's king stands in front of stronger side's pawn, on or near the promotion square, and in which the weaker side is able to prevent the stronger's king from advancing to the sixth (or third) rank. Dvoretsky's Endgame Manual (2003) offers a typical example (145).* The position is so-named because François-André Danican Philidor was the first to demonstrate the defense in his Analysis of the Game of Chess (1777), 275-282.


With Black on move, moving the rook to almost any square along the b-file holds the draw. 1...Rb6 is the clearest and easiest demonstration of the technique. Philidor noted, "By keeping that line with his rook, he hinders your king from advancing" (275).

Mark Dvoretsky notes that Philidor thought that White could win if he were on move, but later analysis has revealed that he is wrong on this point. In Philidor's position, White is on move, but his initial setting differs in one important respect from Dvoretsky's diagram. The pawn has advanced to the fifth rank in Dvoretsky.

Philidor presents the following position.

White to move

After the moves 1.e5 Rb6 2.Ra7, the position is almost identical to Dvoretsky's with only the Black rook on a different square. With Black on the move, Dvoretsky's key move creates the position in Philidor's analysis, but in Philidor Black is still on move. In some positions, such a transfer of the side to move proves critical, but here it is not so.

Philidor gives 2...Rc6 with the comment: "He ought not to depart from this line with his rook, but at the very instant when you push your pawn" (277).

3.e6 Rc1

"If he had given check, he would have lost the game" (Philidor).

4.Kf6 Rf1+

Philidor asserts, "He must continue to give you check, in order to drive you away from your pawn; and at the very moment when your king falls upon his rook, he will attack and take your pawn" (277).

Philidor's Back-Game**

Philidor's analysis of the position where he asserts that White may win begins from his diagram and offers Black moving first, 1...Ra1.

White to move

We see the essential elements here are the same as in Dvoretsky's position with White to move.

2.Kf6 Rf1+ 3.Ke6 Kf8 4.Rh8+ Kg7 5.Re8

Philidor states that this move is the only one that "can insure the game" (279). Checking the position with tablebases confirms that Philidor was in error, as noted by Dvoretsky.

5...Re1 6.Kd7

Black to move

6...Kf7

This move is the key error. Philidor offers an alternative in the notes: 6...Rd1+ 7.Ke7, but he misses the key defensive idea that was discovered by later analysis, 7...Ra1!

7.e6+ Kg7 8.Ke7

Here, White missed the winning 8.Ra8 (also Rb8, Rd8, and Rc8).

8...Re2+-

8...Ra1 draws, again.

The rest of Philidor's analysis is a good illustration of a winning technique that works in some Lucena positions, but differing from the orthodox bridge building on the fourth rank.


*Other books offer slightly different positions. Silman's Complete Endgame Course (2007) has 6R1/4k2r/8/3KP3/8/8/8/8 (126). Fundamental Chess Endings (2001) by Karsten Muller and Frank Lamprecht has 1r3k2/R7/8/5PK1/8/8/8/8 (177). Grigory Levenfish and Vasily Smyslov, Rook Endings, trans. by Philip J. Booth (1971) has a partial mirror image of the position in Philidor's text: the White king is flipped to the other side of the pawn and the rooks have swapped rook files. It is 4k3/R7/7r/3K4/4P3/8/8/8 (15). Reuben Fine, Basic Chess Endings (1941) is almost identical to Philidor's with only the Black rook one square to the right (287).

**Back-game was the term employed for variations in seventeenth and eighteenth century chess texts.

Vexing

My failure this morning is due to exhaustion, not my failure to understand the demands of the position. This endgame study attributed to Edward Lasker appears in the Encyclopedia of Chess Endings II (1985).* There it is the eleventh problem in the text and the solution is a simple matter of reaching a version of the tenth problem.

White to move

White's difficulty stems from the failure of the simple 1.Rh5 (or Ra5) due to 1...Rd7+! and stalemate threats. I spent some time with such futile efforts against the silicon beast before I stumbled onto 1.Kc5, the only winning move.

Problem number ten is simple:

White to move


*The second edition of this volume was released earlier this year, but I have not yet invested in the updated version and am using the first edition.
Detail: Vexing

Practicing Rook Endings

After my opponent and I both managed to blow the rook ending in a blitz game that I played on my iPhone, I spent some time playing through possible variations against the computer. This sort of training can build confidence as I solve problems. It can lead to despair as I fail. Both are instructive.

White to move
After 37...Rc3
I played 38.Rb5?

The game continued 38...Rxe3 39.a5 Ra3 40.Rb8+ Kh7 41.Rb7 Kg6 42.Ra7 f6?! 43.exf6 gxf6

This position may be equal.

White to move

44.a6 e5 45.Kg1

Black to move

45...e4?! 46.Kf2= Kf5 47.Ra8 Kf4 48.g3+ Kf5 49.a7

Black to move

49...e3+??+-

I went on to win. 49...Ra2+ holds the draw.

Training Game A

In the first practice session, I returned to the position after 37...Rc3 and tried 38.Ra8+. Rather than burdening my reader with all the moves in the long battle, I will limit myself. The game came one move short of a draw by the 50-move rule. I wish to present a few of the positions that I think are instructive.

White to move
After 39...Kg6
White can endure a few checks:  40.Kg3! Rxe3+ 41.Kf4 Re2 42.g3 Ra2 43.a5=

Black to move

The White king is vulnerable to checks, but the a-pawn is a threat that compensates.

The computer and I reached this position.

White to move
After 62...Ra6
I felt a sense of despair that my h-pawn was to fall, but making the only moves that seemed sensible demonstrated than my g-pawn was equal to the Black rook.

63.g4! Rxh6+ 64.Kg3 Rd6 65.g5 e1Q+ 66.Rxe1 Kxe1 67.Kf4 Rd4+ 68.Kf5

Black to move

In another line from this game that diverged at move 49, I found myself in this position.

White to move
After 64...Rh2
Again, my h-pawn looks threatened. This time, however, I do not have a g-pawn that I can push. However, I quickly noticed that I could reach a Philidor Position--the classic third-rank defense.

Hence 65...Rb8! Rxh4 66.Rb4+

(I could have played 66.Rb3)

66...e4 67.Rb3

Black to move


Training Game B

In the second game against Hiarcs, I started with an improvement on the part of my opponent at move 45. Instead of 45...e4, I loaded the position after 45...Kf5! Defense of a slightly worse position was difficult, but after several takebacks, I seem to have found a way to maintain equality.

The most instructive position came after 62...Ra4+.

White to move

63.Kf5! is the only move that draws. This time, White's h-pawn proves to be an equalizing threat.

63...Kxg2 64.h4 Kg3 65.Rg8+ Kh3 66.h5 f3 67.Rg1

Black to move

67...Ra5+ 68.Kg6 Ra6+ 69.Kg7 f2 70.Rf1 Kg2 71.Rxf2+ Kxf2 72.h6

Black to move

The engine always plays until lone kings stand on the board, but at this point the result should be clear.
Older Post ►
 

Copyright 2011 Chess 2 Skills is proudly powered by blogger.com