Showing posts with label mobility. Show all posts

Flexibility

One of the hallmarks of modern opening play is to aim for maximum flexibility. That is, you want to use the move order that will achieve a position where you have excellent choices of how to proceed.
Edmar Mednis*
My study game this week is the second match game between Paul Morphy and Alexander Meek at the First American Chess Congress, 1857.** Friday morning, I played Rashid Ziyatdinov's Position 152 (GM-RAM: Essential Grandmaster Knowledge) against Rybka 4 and managed to win. Today, I am mulling over the initial moves in the game.

Morphy,Paul -- Meek,Alexander Beaufort [C01]
USA–01.Kongress New York (2.2), 16.10.1857

1.e4 e6 2.d4 g6 3.Bd3 Bg7 4.Be3

Up to this point, the moves are identical to those in the fifth match game between Adolf Anderssen and Howard Staunton at the London International Chess Tournament, 1851 (see Anderssen -- Staunton 1851).

4...Ne7

Is Meek's play superior to Staunton's?

5.Ne2 b6 6.Nd2 Bb7

White to move

This position offers aesthetic appeal and also anticipates the twentieth century struggles of the hypermoderns. White occupies the center, while Black seeks to contest the center from a distance.

Morphy violated the not yet formulated rule that knights should be deployed before bishops, and also posted his knights on slightly less active squares than the more usual c3 and f3. In doing so, however, his f- and c-pawns remain unimpeded.

François-André Danican Philidor considered it an error to block the f-pawn, but few chess players have agreed with him on this point. Philidor was concerned about reducing the flexibility of the pawns. In the diagram position, Morphy's f- and c-pawns are prepared to advance one square to support the center, or to advance two squares to claim more space on the chessboard.

White's bishops are also more flexible than Black's. Dan Heisman employs the term "two-way bishops" in Elements of Positional Evaluation (2010), quoting Aron Nimzovich. Nimzovich offers an example of defending pieces with "slight elasticity (capacity for maneuvering) ... in the case of a sudden attack on another wing, they will not be able to equal the attacking pieces in rapidity of motion" (My System [1947], 147).

Each of Black's bishops occupies a long diagonal and strikes towards the center. White's bishops on the other hand, occupy the center and are able to strike in either direction. As this game developed and the center closed, Black's light-squared bishop was locked out of the action. In Morphy's game against Meek, this bishop took no part in the battle. In my game against Rybka (beginning at move 19 in Morphy's game), this bishop became Black's last piece, defending a hopeless position against a knight and two pawns.

White's knights impede the mobility of the queen and are themselves less mobile on the second rank than the third. On the other hand, both knights are poised to maneuver to either wing.


*"What Price Flexibility?" Inside Chess (13 November 1995), 14; as quoted in Dan Heisman, Elements of Positional Evaluation: How the Pieces Get Their Power, 4th. ed. (Milford, CT: Russell Enterprises, 2010), loc. 869 (Kindle edition).

**I describe my this aspect of my current study plan in "To Know a Position."

McDonnell's Cavalry

McDonnell -- La Bourdonnais 1834

In the twenty-first game of their first match, Louis-Charles Mahé de La Bourdonnais castled queenside and launched a kingside assault with pawns and heavy pieces. Alexander McDonnell responded with a thrust of his a-pawn and fine piece play in the center. La Bourdonnais, playing White, genereated clear checkmate threats, but McDonnell parried these. His a-pawn and knights proved stronger than the French player's heavy pieces.

I am annotating all of the games of this match without reference to engine evaluations. My series on this match began with "Three Fighting Draws". Game 20 is discussed in "Materialism".

De Labourdonnais,Louis Charles Mahe -- McDonnell,Alexander [C24]
London m1 London (21), 1834

1.e4 e5 2.Bc4 Bc5 3.Qe2 Nf6 4.d3 Nc6 5.c3

This move is an improvement over game 19 (see "After a Long Drought ...").

5...Ne7 6.f4

LaBourdonnais opts for some sort of deferred King's Gambit. As there are no other games in the database with this position, the statistics are 100% in favor of Black.

6...exf4 7.d4 Bb6 8.Bxf4

Black to move

White has a strong center, and yet I'm tempted to recall a rule that Emanuel Lasker would lay down sixty years after this game: "bring out your knights before developing the bishops" (see "Lasker's Rules").

8...d6 9.Bd3

Is the e4 pawn threatened somehow?

I like 9.Nf3.

9...Ng6 10.Be3

White occupies more space on the chessboard. On the other hand, Black's pieces do not lack mobility. The knights are well placed on the kingside. White's central pawns are somewhat offset by the half-open f-file. White's king could prove to be vulnerable on g1.

10.Bg5 is quickly refuted. 10...h6 11.Be3.

10...0–0 11.h3 

Black had control of g4. White challenges this domination. However, contesting this square has the consequence of creating vulnerabilities on the dark squares.

11.Nf3 might have been better. 11...Bg4 12.0–0.

11...Re8 12.Nd2 Qe7 

White to move

Now Black has three attackers on e4, which outnumber the two defenders. But, with the Black queen in front of the rook, the pawn remains safe for now. Minor pieces defend a pawn attacked by heavy pieces. Nf6-d5-f4 could be a threat.

13.0–0–0 c5

McDonnell disrupts White's center.

13...Nd5 does not seem as good. 14.exd5 Qxe3 15.Qxe3 Rxe3 16.Bxg6 hxg6 and the game seems equal.

14.Kb1 cxd4 15.cxd4 a5! 

Both players thrust their pawns at the the enemy monarch, but Black's piece play in the center will prevail.

16.Ngf3 Bd7 17.g4 h6 18.Rdg1

White's plan is clear.

18...a4

White to move

19.g5?

19.a3 would prevent the Black pawn occupying this square.
19.Nc4 also guards a3 as well as attacking the dark-squared bishop. 19...Ba5.

Perhaps La Bourdonnais underestmated the power of a Black pawn ensconced on a3. Or, perhaps, he underestimated Black's tatical resources for bringing other pieces to bear on the White king. With Black's knights in front of their king, it is not obvious that they will play a decisive role in the attack on the White king.

19...hxg5 20.Bxg5 a3 21.b3

21.Nc4 may have been worth considering.

21...Bc6 22.Rg4 Ba5 23.h4 Bxd2 24.Nxd2

Black to move 

24...Ra5! 25.h5 Rxg5

Black seeks to eliminate both White bishops, after which the White king will be defenseless. McDonnell's play in this game merits study.

26.Rxg5 Nf4 27.Qf3 Nxd3

White to move

28.d5

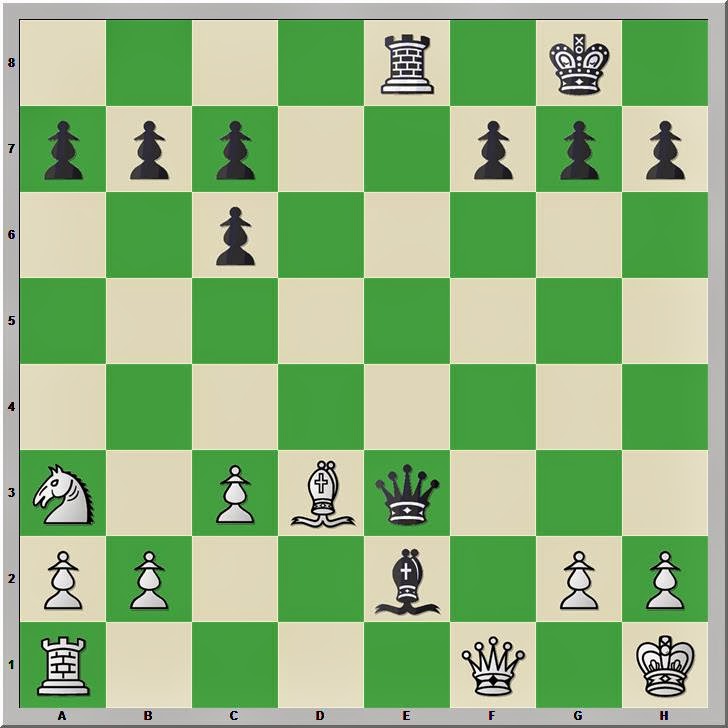
28.Qxd3 merits attention 28...Nxe4 and 29.Rgg1 seems best.
   If 29.d5, then 29...Nxd2+ 30.Qxd2 Qe4+ with a decisive gain of material for Black.
   If 29.Rg4, then 29...Nf2 is unpleasant.
Play might continue 29...Nf2 30.Qg3 Be4+ 31.Ka1
   (31.Nxe4 loses quickly 31...Qxe4+ 32.Ka1 Qxd4+ 33.Kb1 Qb2#)
31...Qf6 and Black seems better.

28...Nxd5!

This move appears decisive.

29.Rhg1

29.exd5 fails smply to 29...Qxg5.
29.Rxd5 looked good to me at first, but Black seems to have a decisive attack after 29...Bxd5 30.exd5 Qe5 31.Nc4 Qd4 32.Rf1 f6.

29...Nc3+ 30.Ka1

30.Kc2 is an interesting effort 30...Nxe4 31.Rxg7+ Kh8 32.Qf5 Nb4+ 33.Kc1 Nf6 and the threat of Qe1+ with checkmate to follow.

30...Bxe4 31.Rxg7+ Kh8 32.Qg3

White threatens checkmate.

Black to move

32...Bg6

But Black's checkmate threat appears more serious.

33.hxg6

Can White save the game? 33.Rxg6 Qe1+ 34.Rxe1 Rxe1+ 35.Qxe1 Nxe1 ends as in the game.

33...Qe1+ 34.Rxe1 Rxe1+ 35.Qxe1 Nxe1 36.Rh7+ Kg8 37.gxf7+ Kxh7 38.f8N+ Kh6 39.Nb1 Nc2# 0–1

This game belongs on the list of best games from the first match. I think that it is McDonnell's best game so far. Although La Bourdonnais made a few errors, his play was not substandard.

See "La Bourdonnais's Infantry" for the next game.

Materialism

McDonnell -- La Bourdonnais 1834

In game twenty of their first match, Alexander McDonnell sacrificed development for material gain. Louis-Charles Mahé de La Bourdonnais took advantage of this error to launch a decisive attack against White's vulnerable king. McDonnell (1798-1835) was the top player in England in the 1830s. La Bourdonnais (1795-1840) had been France's strongest player for a decade. They met for the match at the Westminster Chess Club in London.

Chess Skills has an ongoing series featuring all of the games in the first match. The series begins with "Three Fighting Draws". My comments on game 19 are in "After a Long Drought ...". My annotations on these games are an element in my own chess training. I am not using chess engines to check my analysis, and make only very limited reference to the work of other commentators.


McDonnell,Alexander -- De Labourdonnais,Louis Charles Mahe [C33]
London m1 London (20), 1834

1.e4 e5 2.f4 exf4 3.Bc4 Qh4+ 4.Kf1 d6 5.d4 Bg4

5...g5 was La Bourdonnais' choice in other games.

6.Qd3

I prefer 6.Nf3.

6...Nc6

White to move

7.Bxf7+?!

Employing a tactic that appears in some of the oldest chess books, McDonnell seizes the opportunity to win a pawn or two.

7.Nf3 might still be worth playing.

7...Kxf7 8.Qb3+ Kg6 9.Qxb7 Nxd4!

Offering the rook may have been a surprising move to the British player.

9...Rc8 10.Qxc6 with a one pawn advantage for White.

10.Qxa8 Nf6

White to move

White has won the exchange, but most of Black's pieces are in play.

11.Na3 f3 12.g3

12.Nxf3 Bxf3 13.gxf3 Qh3+.

12...Bh3+ 13.Ke1

13.Nxh3? Qxh3+ 14.Ke1 Qg2.
13.Kf2 Ng4+ 14.Ke1 f2+.

13...Qg4 14.Be3 d5 15.Qxa7

15.Bxd4 loses the queen. 15...Bb4+ 16.c3 Rxa8.

15...Nc6 16.Qxc7 d4

White to move

17.Bd2

17.Nxh3 does not seem better 17...dxe3 18.Nf4+ Kh6 19.Qxc6 f2+ 20.Kf1 Qf3.
17.Bf2 may hold 17...Qxe4+ 18.Kd1.

17...Qxe4+ 18.Kd1 f2 19.Nxh3 Qf3+ 20.Kc1 Qxh1+ 0–1

McDonnell will win the next game.

Losing my Virginity with the Ponziani

In the second round of the Collyer Memorial tournament yesterday, I played the Ponziani for the first time in a standard game. My prior experience with the opening had been limited to a few games of online blitz the previous three days, one game against a beginner in a chess class that I teach, and against the winner of Spokane Chess Club's winter championship in Friday's blitz tournament. In that game, I had a nice position but then hung my queen.

I have looked over a few Grandmaster games in the past few days. My interest in the opening was stimulated a year ago when Magnus Carlsen played it against Pentala Harikrishna in the 2013 Tata Steel tournament, and then had the Black side in his game against Hou Yifan. The latter was mentioned on this blog while it was taking place. More recently, I have been looking through the games of Rezső Charousek and spent some time this week looking at a miniature that he lost to Geza Marozcy. Here is that game with a few comments.

Geza Maroczy -- Rudolf Rezso Charousek [C44]
Match Budapest (2), 19.04.1895

1.e4 e5 2.Nf3 Nc6 3.c3 d5 4.Qa4 f6 5.Bb5 Nge7 6.exd5 Qxd5 7.d4 exd4

7...Bd7
7...Bg4

8.cxd4 Bd7 9.Nc3 Qf5 10.0–0 Nc8??

10...0–0–0 11.Be3 a6 12.Be2 g5 13.Qd1 Nd5 14.Nxd5 Qxd5 15.b3 g4 16.Bc4 Qh5 17.Nd2 Bd6 18.g3 f5 19.f4 b5 20.Bd5 Rhe8 21.Re1 Bb4 22.Rc1 Ne7 23.Bh1 Qf7 24.a3 Ba5 25.b4 Bb6 26.Qc2 Nd5 27.Qb3 Be6 28.Bxd5 Bxd5 29.Qc3 Bb7 30.Qb3 Qd7 31.Nf1 Bxd4 32.Red1 Bxe3+ 33.Nxe3 Qe7 34.Nd5 Bxd5 35.Rxd5 Rxd5 36.Qc2 Qe3+ 37.Kh1 Qe4+ 38.Qxe4 Rxe4 39.Rc2 Red4 0–1 Kelling,F -- Gyles,A, Auckland 1914

11.d5 Nb6 12.dxc6 Nxa4 13.cxd7+ Kd8 14.Bxa4 c6 15.Rd1 Bc5 16.Be3 Bb6 17.Rd6 Kc7 18.Rad1 Rad8 19.Bxb6+ 1–0

For the past few days, I have been contemplating deploying the Ponziani in a tournament game. Self-doubt has been a deterrent. Having been pleased with my play in round one, I decided to play it.

Stripes,James (1899) -- Lombardi,George (1429) [C44]
Collyer Memorial Spokane (2), 22.02.2014

1.e4 e5 2.Nf3

I briefly considered 2.f4, which would have been Charousek's move.

2...Nc6 3.c3

I also considered the Spanish and the Italian, both of which I have played in many games over the years.

3...Nf6

Black has several choices, but this move is most popular.

4.d4 Nxe4

I had looked at games with this move, but forget the main lines. I was now completely on my own tactical and positional understanding without any database memory. To be forced to create something new early, and to force one's opponent to do the same is a principal appeal of the Ponziani.

5.d5

I found the main line.

Black to move

5...Nxf2!?

I was busy taking photos of the players for the Spokane Chess Club when my opponent made this astounding move. Returning to my own board, I was certain the move was an error. Nonetheless, my king did become exposed and I had several alternate lines to consider.

6.Kxf2 Bc5+ 7.Be3 Bxe3+ 8.Kxe3

Black to move

My king's position reminds me of a conversation I had the previous evening concerning the Steinitz Gambit, where Steinitz himself marched his king forward to e3 in some King's Gambit games. The prompt was the second game that John Donaldson showed during his lecture. In that game, White's king stepped up to d2 to connect the rooks, then moved to the third rank. Eventually, it took up position on f2 where it helped keep Black's rogue queen trapped.

8...e4 9.dxc6

I spent six minutes on this move (compared to four for the whole game prior). Most of that time was spent contemplating my next move.

9...exf3 10.Qxf3

The materialistic 10.cxd7+ struck me as being a bit too helpful to Black's mobilization. With a vulnerable king, that seemed a foolish course. A computer can work out the tactics and may favor the material gain. I may check this game with an engine after posting these annotations.

10...0–0 11.Bd3 dxc6

White to move

12.Rd1?!

This set-up of a cheap tactic invites trouble. I seemed to be daring my opponent to find a way to skewer my queen to get at the rook. Perhaps Re1 puts the rook on a better square. I also contemplated Nd2.

12...Re8+

Somehow I overlooked this zwischenzug to set up the skewer.

13.Kf2 Qh4+ 14.Kg1 Bg4 15.Qf4

A strong chess player would have found this pin before playing 12.Rd1, and then assessed the consequences of Black's choices.

Black to move 

15...Re1+

15...g5! looked dangerous to me. 16.Bxh7+ Kxh7 17.Qxf7+ Kh8 and I would seriously consider bailing out of this game with a draw.

My opponent chose a forcing line that kept me from burning much clock time contemplating alternatives. It appeared there were none.

16.Rxe1 Qxe1+ 17.Qf1 Qe3+ 18.Kh1 Re8 19.Na3 Be2

My opponent used ten minutes deciding upon this move, and I had already decided to force the queens off the board with the bishops. The clock showed 1:32 remaining for me and 1:06 for my opponent. Our time control was 1:55 for the game plus a five second delay.

White to move

20.Qxe2 Qxe2 21.Bxe2 Rxe2 22.Rb1?

22.Nc4 must be better.

22...b5 23.Kg1 f5

White to move

24.Rd1

My seven minutes on this move was my longest think of the game. I should have spent a few of these minutes on move 22.

24...Kf7

The critical line that I examined was 24...Rxb2 25.Rd8+ Kf7 26.Rd7+ Kf3

The king could consider e8 and e6, too, as I'm not interested in the kingside pawns just yet.

27.Rxc7 Rxa2 28.Rxa7 with the idea of 29.Nxb5 if the rook remains on the a-file.

A version of this line is still possible after 24...Kf7, but is more likely advantageous for White, or so I thought during the game.

25.Rd7+ Re7

My opponent makes my job easier. At this point, my opponent from the previous round stopped by and looked at the game. He smiled because in our postgame analysis, we had played out a variation where I had a knight against a superior number of pawns. He, too, had sacrificed a knight for two pawns and an attack.

26.Rxe7+ Kxe7 27.Nc2

Black to move

27...g5?

Black needed to address the threatened fork with 27...c5 or 27...Kd6.

28.Nd4 Kf6 29.Nxc6 a6 30.Kf2?

The immediate 30.Nb4 was decisive.

30...h5 31.Nb4

Black to move

Another fork is coming.

31...a5 32.Nd5+ 1–0

I am pleased with the result.

Five players finished day one with 3.0 and with my third round bye, I am one of three with 2.5. This morning, I have a stronger opponent.

Older Post ►
 

Copyright 2011 Chess 2 Skills is proudly powered by blogger.com