Showing posts with label pin. Show all posts

The Opera Game

H.R.H. the Duke of Brunswick is a thorough devotee to Caissa; we never saw him but he was playing chess with some one or other. We were frequent visitors to his box at the Italian Opera; he had got a chess-board even there, and played throughout the performance. On our first visit "Norma" was performed. The Duke's box is right on the stage; so close, indeed, that you might kiss the prima donna without any trouble. Morphy sat with his back to the stage, and the Duke and Count Isouard facing him. Now it must not be supposed that he was comfortable.
Frederick Milnes Edge, Paul Morphy: the Chess Champion (1859), 172.
A casual reader of Frederick Edge's Paul Morphy, could easily surmise from this passage that Vincenzo Bellini's Norma was performed on stage when Paul Morphy played his "most famous game".* However, David Lawson, who researched matters thoroughly, asserts that the game was played during a performance of Barber of Seville by Gioachino Rossini.
On the second of November they heard the Barber of Seville, during which Morphy played his most famous game, the Duke again consulting with Count Isouard. In his games with Morphy, the Duke always had a partner, sometimes two, Counts Isouard and Casabianca consulting against him.
Lawson, Paul Morphy: the Pride and Sorrow of Chess (2010), loc. 3271 Kindle ed.
Lawson's documentation is not on par with his research. Verifying his claims, and the counter-claims of many writers before him, has proven vexing. Edward Winter's outline of several unknown details and the contours of disagreement is well-worth reading (citation below).

It seems clear from these two passages in the books by Edge and Lawson that Morphy played several games against the Duke of Brunswick in consultation with one or more Counts. Several of these games were played at the opera as a guest of the Duke. Yet, it seems, only one record of these games remain.

This one recorded game was a stellar performance by Morphy. It is included by Rashid Ziyatdinov in GM-RAM: Essential Grandmaster Knowledge as game 14. It was my study game a week ago, and this past week comprised my "lesson of the week" for youth chess players. It is an instructive illustration of effective and ineffective pins. My annotations were written without sight of a chess board, giving me confidence that I am beginning to understand this game.

The Game

Morphy,Paul  -- Duke of Brunswick, Count Isouard [C41]
Paris, 1858

1.e4 e5 2.Nf3 d6 3.d4 Bg4

The inadvisability of this pin is addressed in "Lasker's Rules".

4.dxe5

Black to move

The rapid conclusion of this game may give the impression that the Duke and Count were weak chess players. But, here, they demonstrate understanding of zwischenzug--something many of my young chess students need to learn.

The immediate 4...dxe5 loses a pawn.

4...Bxf3 5.Qxf3 dxe5 6.Bc4

This simple checkmate threat is far too effective against scholastic players. Even at the Washington State Elementary Chess Championship, games will end quickly with Scholar's Checkmate.

6...Nf6

The Duke and Count block access of White's queen to f7.

7.Qb3

Morphy renews the threat against f7, adding an attack on b7. From b7, the queen may snatch the rook.

Black to move

Thinking that many of my students could quickly find the answer, I asked: How can Black protect both the pawn on f7 and the rook on a8? I was disappointed at the answers.

7...Qe7 8.Nc3

8.Qxb7 Qb4+ 9.Qxb4 Bxb4+ 10.c3

8...c6 9.Bg5

Morphy's pin of the king's knight is vastly more effective that when his knight was pinned, although he, too, violates the letter of Lasker's Rule.

9...b5?

9...Nbd7 seems better.

White to move

10.Nxb5! cxb5 11.Bxb5+ Nbd7

White to move

Morphy has managed to pin both of Black's knights.

12.0–0–0

Both White rooks will come to d1 for the battle of d7.

12...Rd8 13.Rxd7

It was important to capture with the rook, temporarily sacrificing an exchange when already down material, because this capture keeps a Black piece pinned on d7.

Rxd7 14.Rd1 Qe6

White to move

White is down a rook for two pawns, and yet has more force in the battle. If Black is able to mobilize their bishop and other rook, this game will become one of Morphy's rare losses.

15.Bxd7+ Nxd7 16.Qb8+

Forcing Black's response and leading to checkmate. This queen sacrifice is the essence of the Opera Checkmate, a combination that leads to a more elementary bishop and rook checkmate.

16...Nxb8 17.Rd8# 1–0


*Frank Marshall called Morphy's opera game, "the most famous game of all time" (Comparative Chess [1932]). See Edward Winter, "Morphy v the Duke and Count," Chess Notes (updated 20 March 2014).

Pawn Wars

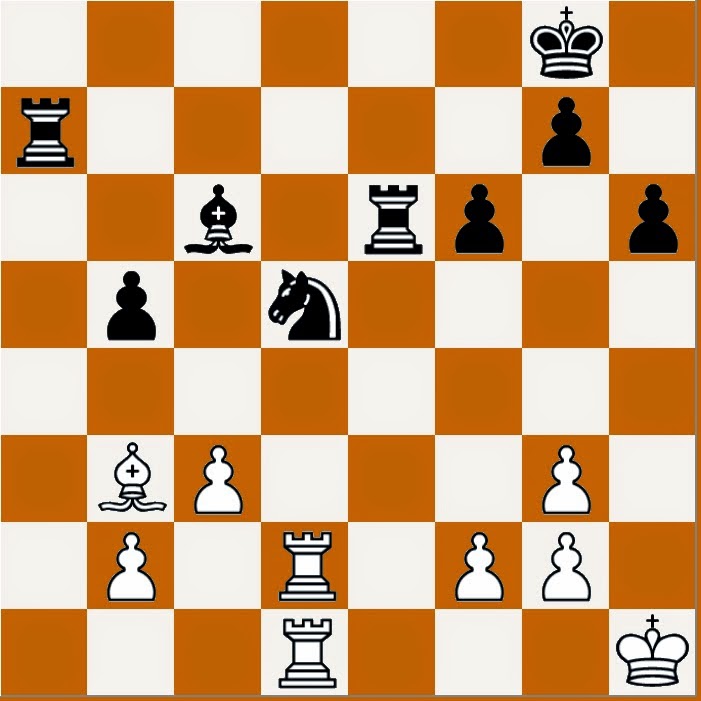
In a game played ten years ago, Sergei Rublevsky had a one pawn advantage.

White to move

He played 33.Rxd5!

A forcing sequence resulted. 33...Bxd5 34.Bxd5 Kf7 35.Re1 Raa6 36.Kg1 Ke7 37.Rxe6 Rxe6 38.Bxe6 Kxe6

White to move

Rublevsky was able to win the pawn ending. The game was published as Chess Informant 91/236.
Detail: Pawn Wars

Attack and Counterattack

McDonnell -- La Bourdonnais 1834

In my series of blog posts on the matches between Alexander McDonnell (1798-1835) and Louis-Charles Mahé de La Bourdonnais (1795-1840), we have reached the eighteenth game of the first match. The match was scheduled for twenty-one games, draws not counting. La Bourdonnais has won the match with eleven wins. McDonnell has two wins and there have been four draws. Nonetheless, they continue the match until completing twenty-one decisive games.

I am going through the games without benefit of engine analysis. There are likely appaling errors in some of my analysis. The series begins with "Three Fighting Draws" (June 2014) and I discuss game seventeen in "Mating Attack".

In game eighteen, McDonnell again adopts the King's Bishop's Gambit as he had in game eleven (see "Losing Takes a Toll"). This opening would develop a strong reputation over the next several decades, although it is rarely played today. Adolf Anderssen's "Immortal Game" began as a King's Bishop's Gambit.


McDonnell,Alexander -- De Labourdonnais,Louis Charles Mahe [C33]
London m1 London (18), 1834

1.e4 e5 2.f4 exf4 3.Bc4 Qh4+ 4.Kf1 g5 5.Nc3 Bg7 6.d4 Nc6

An unusual move. More common is6...Ne7. One notable game continued 7.g3 fxg3 8.Kg2 d6 9.hxg3 Qg4 10.Qxg4 Bxg4 11.Bxg5 Capablanca,J--Allies, Philadelphia 1910. It ended as a draw in 29 moves.
La Bourdonnais played 6...d6 in three other games in these matches.

White to move

7.e5

McDonnell's move is unique in the ChessBase database. It removes f6 from the undeveloped Black knight, but opens f5 for the same. This move also has the consequence that Black's d-pawn cannot be captured on d5. This move opens e4 for a White knight, which McDonnell will use soon.

The immediate  7.Nf3 is probably a better move. Play might continue 7...Qh5 8.Nd5 Kd8 9.Be2 Qg6 10.Nxg5 Qxg5 11.Bxf4 Qg6 12.Bxc7+ Ke8 13.Bh5 Qe6 14.Bg3 Nagibin,G (2392)--Logashov,S (2325) Moscow 2009. White won in 43 moves.

7...Nge7 8.Nf3 Qh5 9.Ne4 h6

White to move

10.Nf6+

McDonnell might have prepared his attack with 10.Qe2 Nf5

Here I looked at two ways to proceed:
a) 11.Nf6+ Bxf6 12.exf6+ Kd8 13.c3

b) 11.Nd6+ Nxd6 12.exd6+ Kd8 13.d5 (13.dxc7+ Kxc7 14.c3) 13...Ne5 14.Nxe5 Qxe2+ 15.Bxe2 Bxe5 16.dxc7+

He also might have tried 10.c3 Nf5 11.Kf2.

I am not certain if any of these lines are better than McDonnell's play in the game.

10...Bxf6 11.exf6 d5 12.Bd3 Nf5 13.Qe1+

13.c3 is an interesting alternative, which La Bourdonnais could meet with the simple 13... 0–0 or the double-edged 13...Ng3+!? 14.Kg1 Nxh1 15.Qe2+ Be6 16.Bf5 0–0 17.Bxe6 fxe6 18.Qxe6+ Kh7 19.Qf5+ Kh8 20.Bxf4! Here White appears to have compensation for the sacrificed material.

Analysis diagram after 20.Bxf4
13...Kd8 14.Ne5

14.c3 Ng3+

14...Nfxd4

14...Ng3+ 15.Kg1 Nxh1 16.Nxc6+ bxc6? 17.Qe7#.

15.c3 Nxe5 16.Qxe5 Nc6 17.Qxd5+ Ke8

White to move

18.Bb5

18.Bxf4!?

McDonnell missed a simple pin, or he rejected it for the gain of material in the game.

18...Be6 19.Re1.

18...Be6 19.Bxc6+ Kf8 20.Qc5+ Kg8 21.Bf3 Qg6

White has more material on the board, but how will the rooks come into play? How will the dark-squared bishop participate in the battle?

22.Qd4?

The effort to defend the f-pawn proves costly. This move seems to me to be McDonnell's critical error.

22.Bd2 seems better to me with at least three ways for Black to proceed:

a) 22...Qxf6 23.Re1.

b) 22...b6 23.Qf2 Rd8 24.Rd1 g4 25.Bc6 Qxf6.

c) 22...Qd3+ 23.Ke1 Rd8 24.Qf2 g4 25.Bxb7.

White's chances seem to me better in each of these lines than they were in the game, although Black has seized the initiative in each case. White retains material superiority and may be able to defend against Black's counterattack.

22...c5 23.Qe5 Re8

White to move

24.Be2

Perhaps 24.Kf2 was necessary. Black's response might have been 24...Bd7 25.Qd5 Bc6 26.Qd2.

24...f3! 25.Kf2

25.Bxf3 Bc4+ 26.Kf2 Rxe5 and Black wins.

25...fxe2 26.Be3 b6 27.h4

27.Rhe1 Bd7 28.Qc7 Qf5+ 29.Kg1 Rxe3 and Black wins.

27...Bd7 28.Qd5 Qxf6+ 29.Kxe2 Bg4+ 30.Kd2 Rd8 0–1


White's attack fell short, although he recovered the pawn sacrificed in the opening. McDonnell showed that he could achieve material superiority through tactics, but he then faltered.

McDonnell's long sequences of losses, interrupted only by a single draw, would end with the next game. The contestants would alternate wins--always with the Black pieces--until La Bourdonnais would win with White in the final game of the first match.

That Pin of f7

McDonnell -- La Bourdonnais 1834
Match 1, Game 15

Alexander McDonnell (1798-1835) lost a long string of games to Louis-Charles Mahé de La Bourdonnais (1795-1840) during their first match. After fourteen games, La Bourdonnais led 8-2 (draws did not count).

After going through all of McDonnell's games against other opponents that are available in the ChessBase database, I have been working through his games with La Bourdonnais. As I work through these games, blogging them, I am keeping my research light and avoiding analysis engines. I intend to work through all 85 games of their six matches, and then to spend more time comparing my comments to published comments by stronger chess players.

I posted my comments on game 14 in "McDonnell -- La Bourdonnais 1834". My series on this match begins with "Three Fighting Draws". Each post in the series contains links fore and aft.

De Labourdonnais,Louis Charles Mahe -- McDonnell,Alexander [D20]
London m1 London (15), 1834

1.d4 d5 2.c4 dxc4 3.e3 e5 4.Bxc4 exd4 5.exd4 Nf6 6.Nc3 Be7

For 6...Bd6 see "Weakened King" (game 12).

7.Nf3 0–0 8.h3

Black to move

8...c6

I would be inclined to try 8...Nbd7 with the idea of Nd7-b6 then to d5. Blackade the IQP. Posting a knight on d5 also reduces the vulnerability of f7. It was not surprising to find that my idea is given as one of the main lines in the Encyclopedia of Chess Openings.

Of course, there was no well-developed theory concerning isolated queen pawns (IQP) in 1834. Rather, as Colin Crouch noted last week, "to far greater an extent than anyone else in modern chess history, they had to think everything by themselves" ("The Extraordinary Summer of 1834"). When McDonnell and La Bourdonnais contested their matches, opening theory was primitive, endgame theory limited, and chess writing concerned with middlegame play almost non-existent. No other matches between masters had been recorded for the edification of those who followed.

The beginnings of modern chess theory are built upon a foundation of the study of the games of these 1834 matches by Paul Morphy, Howard Staunton, and those who followed in their wake.

9.Be3 Bf5

This move invites trouble, as White's pawns come forward with tempo

10.g4

First hit on the bishop.

10...Bg6 11.Ne5

Second hit on the bishop, taking advantage of the pin on f7. This pin seemed to be the decisive strategic element: continuous tactical pressure on Black's vulnerable king.

11...Nbd7 12.Nxg6

Wrecking Black's kingside pawns.

12...hxg6 13.h4

Another pawn comes forward. White's king sits on an open file, and cannot castle behind an intact pawn shield. Yet, Black's king is the one under attack.

13...Nb6 14.Bb3

Black to move

14...Nfd5

Black does manage to blockade the d-pawn, but perhaps too late. White seems to have the makings of a strong attack upon Black's castled position.

14...Nbd5 15.g5 Nh5 16.Qf3 and the d5 knight has only two defenders.

15.h5 Nxe3

McDonnell removes an attacker.

16.fxe3 Bh4+

Perhaps Black might have secured the kingside with 16...g5 17.Qf3 (17.h6 g6 18.h7+ Kh8) 17...Re8 (17...Nd5 18.Nxd5 cxd5 19.Bxd5) 18.Ne4.

17.Kd2

It is interesting to compare the vulnerability of McDonnell's king on g3 and h3 when he has White, to the vulnerability of La Bourdonnais's king in this position. The difference seems to be better piece coordination for the French player.

17...gxh5 18.Qf3 Bg5 19.Raf1 Qxd4+

White to move

McDonnell recovered a pawn with a pin.

20.Kc2

I am reminded of a recent tournament game--a Ponziani--in which my king might have found security here on c2 had I played better.

20...Qf6 21.Rxh5 Qg6+

21...Qxf3 appears to be the major alternative 22.Rxf3

Black to move
Analysis diagram
22...Bf6 (22...Be7 23.Rfh3) 23.g5 g6 24.Rh1 Bg7 (24...Bxg5 25.Rg3) 25.Ne4 and White should win.

22.e4 Nd5 23.Rfh1 Bh6 24.g5

Black to move

24...f5 25.Nxd5 cxd5 26.Bxd5+ Kh7

The pin of the f7 pawn is no longer a factor, but it contributed to White's decisive penetration along the h-file.

27.Rxh6+ gxh6 28.Rxh6+ Qxh6 29.gxh6 1–0


My comments on the next game can be found in "Strong Knights".

Find the Blow

There is a nice miniature won by Viktor Kortchnoi that I sometimes attempt to imitate with rare success.

Tatai,Stefano (2455) - Kortschnoj,Viktor (2665) [C01]
Beersheba, 1978

1.e4 e6 2.d4 d5 3.exd5 exd5 4.Bd3 c5 5.Nf3 Nc6 6.Qe2+ Be7 7.dxc5 Nf6 8.h3 0–0 9.0–0 Bxc5 10.c3 Re8 11.Qc2 Qd6 12.Nbd2 Qg3 13.Bf5 Re2 14.Nd4 Nxd4 0–1

The pin of f2 and the advance of White's h-pawn allows the queen to occupy g3. In a recent online blitz game, I found myself in a nice position, but could not find the knockout blow.

Black to move

Pinning

Lesson of the Week

Pinning is the first unit in the classic text, 1001 Winning Chess Sacrifices and Combinations (1955) by Fred Reinfeld. This week's lesson was chosen at random from that unit. I played the position against Stockfish DD prior to putting the position in front of students.

White to move

The position is number 63 in Reinfeld. He does not give the source.
Detail: Pinning

Lesson of the Week

Working with Pins

Lessons the past couple of weeks have featured positions where a pin may be exploited to gain material. Sometimes another tactic is needed to create a pin and win material.

This position occurred in an online game one year ago. Black found the correct tactic here, but later lost his way and threw away his queen. White then demonstrated that he had difficulty finding an easy checkmate.

Black to move

Bonus problems: find White's quickest rout to checkmate.

White to move

Here White missed a checkmate in one.

White to move

Lesson of the Week

In this position, I have misplayed the Benoni Defense and offered my opponent the opportunity to gain a decisive advantage. This game was played on US Chess Live in 2001. I found it looking through my databases for examples of certain common pins.

Opponent -- Stripes
USCL 13.01.2001

1.d4 Nf6 2.Nf3 c5 3.d5 e6 4.c4 exd5 5.cxd5 d6 6.Nc3 g6 7.e4 Bg7 8.Bg5 Bg4 9.Bb5+ Nbd7 10.h3 Bxf3 11.Qxf3 O-O

White to move

11.O-O

White missed the win, and after 12...Ne5 Black began to solve his self-imposed problems and went on to win.

Find the move that White should have played. As a bonus for readers of this blog, identify Black's critical error leading to the diagram position.

A Simple Pin

Lesson of the Week

As the 2014 Washington State Elementary Chess Championships have concluded, most school clubs have come to an end for the school year. Nonetheless, a few clubs and my class at a home school resource center continue through May. This week, students are presented with a tactical exercise that strong players can solve in a second.

The knights protect each other nicely, but Black's bishop is unprotected. In addition, two White pieces target the f7 square.

White to move

A Typical and Uncommon Position

Although this position contains several common elements that arise in the French, it appears in only thirteen games in the ChessBase online database. It also cropped up in my second blitz game this morning.

The position arises in the Tarrasch after 1.e4 e6 2.d4 d5 3.Nd2 Nf6 4.e5 Nfd7 5.f4 c5 6.c3 Nc6 7.Ndf3 cxd4 8.cxd4 f6 9.Ne2 Bb4+ 10.Kf2 fxe5 11.fxe5 O-O*

White to move

My opponent played 12.Kg1 and I won the game in 47 moves. He lost a pawn on move 33 and lost a piece to a knight fork on move 44.

Black's immediate target is e5. If it were Black's move, the pawn could be taken as one of the defending knights is pinned. The locked center with targets on d4 and e6 is typical of the French Defense. White's king on f2 is a common maneuver. White's bishops have more scope even though neither has moved.

My opponent stepped out of the pin.

A) 12.Kg3 was played in three games. That was the end of one game--a draw was agreed. It was the only game between masters. 12...Ne7 and 12...Nb6 were played in the other two games.

12...Ndxe5+ has not been tried. 12.Kg3 might be regarded as an error.

B) 12.Be3 was played in three games. All continued 12...Ndxe5 13.dxe5 Nxe5

White to move

Skripchenko -- Maric, New Delhi 2000 continued 14.Qb3 b6 15.Rd1 Qe7 16.Kg1 and was drawn in 42 moves.

14.Bd4 was played in the other two games.

Black won a long battle in Matsura -- Cordova, Sao Paulo 2006 that continued 14...Nc6 15.a3 Bd6.

A draw was reached after a few moves in the more recent Kumaran -- Ram, Chennai 2013: 14...Qh4+ 15.Ng3 Nxf3 16.gxf3 e5 and drawn three moves later. 16...e5 may be inaccurate.

Black certainly has the better game after 12.Be3, which may be regarded as dubious at best.

C) 12.a3 was played in three games.

A correspondence game continued 12...Qh4+ 13.Kg1 Rxf3 14.gxf3 Ndxe5

White to move

White should have been happy to escape this correspondence game with a draw.

12...Ndxe5 was played in the other two games.

Black seems to have found frustration in Popov -- Danin, Smolensk 2005, which continued 13.dxe5 Bc5+ 14.Ke1! Nxe5 15.Nxe5 Bf2+ 16.Kd2 Qg5+ 17.Kc2 Qxe5 18.Kb1

Black to move

After his long journey, the White king appears less vulnerable and White went on to win.

White also survived Black's early attack in Polgar,J -- Hernandez, Merida 2000. That game continued 13.axb4 Qh4+ 14.Kg1 Nxf3+ 15.gxf3 Rxf3 16.Ng3 Nxd4 17.Bg2

Black to move

White went on to win.

Black should have the better game after 12.a3, but in practice has failed to prove it.

D) My opponent's 12.Kg1 may be an error.

However, I missed the thematic 12...Ndxe5. Instead, I tried 12...Qb6. My opponent played 13.Be3

Black to move

13...Ndxe5 remains the correct move. Instead, move-by-move, I squandered my advantage and won only due to tactical errors by my opponent in the ending.

Searching the database for the position in the first diagram produces games where it appears that White should be okay. With optimal play by both sides, however, Black should have a clear advantage. White's pawn center is weak in part due to the vulnerability of the White king.


*Notation leading to the diagram position was added per a request in the comments below.

Opening Inaccuracy

Chess is so deep and varied that even on the sixth move in a familiar line, one can reach new positions. Yesterday, I had the Black side of a Nimzo-Indian Defense that transposed into a somewhat obscure line of the Queen's Gambit Declined.

1.d4 Nf6 2.c4 e6 3.Nc3 Bb4 4.Nf3 d5

4...c5 is the normal move in the spirit of the Nimzo-Indian Defense.

5.Qa4 Nc6 6.e3

6.Bg5 is almost as popular and is given in the first four lines of the Encyclopedia of Chess Openings. It may be of interest that in Chess Informant 10/600 Vladimir Sokolov judged 6.Bg5 as dubious, suggesting 6.e3. Perhaps 6.e3 is slightly more accurate than 6.Bg5. Even so, both moves have been played often.

Black to move

6...O-O appears to be the normal move here. My 6...Bd7 is the second most popular choice. Zoltan Gyimesi is the highest rated player who has played 6...Bd7 and he lost that game in a queen ending with most of the pawns remaining on the board and a nearly locked position.

It is hard to blame the opening for that loss. Nonetheless, the scoring percentage differences between 6...O-O and 6...Bd7 seem significant. White scores 55.6% over 411 games after Black castles. In the 55 available games with 6...Bd7, White's score jumps to 68.2%.

In my game, my position quickly grew poor with terrible piece coordination. My position was lost until my opponent blundered an exchange that led to an ending where I had a rook against a knight. All the pawns eventually came off and the game was drawn.

Is 6...Bd7 an inaccuracy, perhaps even an error? I think so.

6...Bd7 forces White's queen to move a second time due to the threatened discovery. 6...O-O steps out of the pin. Perhaps the queen then has less purpose on a4 and will be compelled to move again when Black's bishop is no longer a target.

Why is it an error? Does the bishop have a better square? It may. In games where Black castles, the bishop often goes to d7, but sometimes it goes to e6 or f5. In a few games, it takes up a position on b7. The major problem with 6...Bd7 is that it wastes time. Pieces should be placed on their best squares when they move for the first time. It is not clear in the diagram position where this bishop will be best placed. It is clear, however, that Black will castle kingside.
Older Post ►
 

Copyright 2011 Chess 2 Skills is proudly powered by blogger.com