Showing posts with label vulnerability. Show all posts

Training with Morphy

Playing set positions against a computer develops technique. It is one thing to claim that Black has a decisive advantage, but quite another to demonstrate that advantage against an emotionless monster. During the wee hours of the morning earlier this week, I played out positions from Schulten -- Morphy against Hiarcs on the iPad. The app gives Hiarcs's rating as 2950.

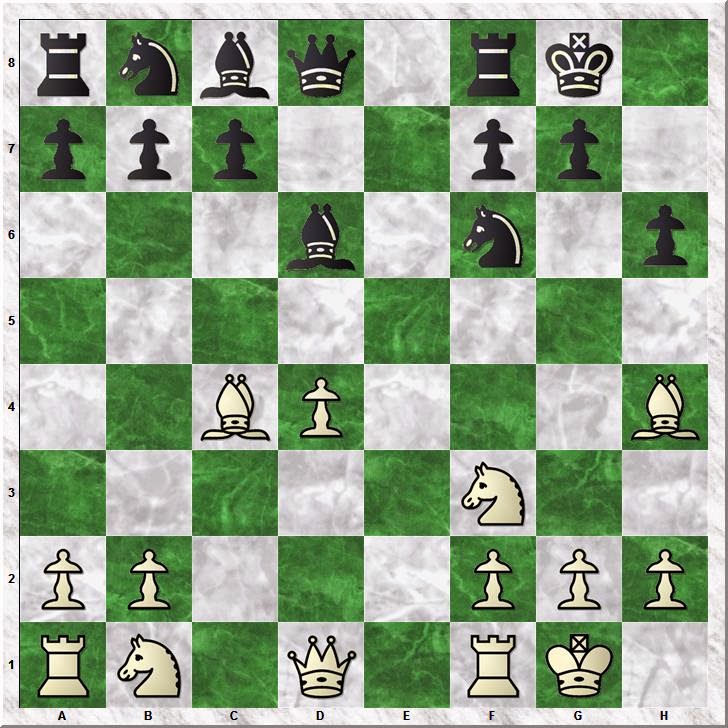
I started with the position that I marked as a decisive advantage for Black in my annotations to the game..

Black to move

Morphy's move is correct and leads to a decisive advantage, so I played 13...Rxe2 to start the game against the app. I set the time control at 10 minutes.

14.Nxe2 Nd4 15.Rb1

Hiarcs deviated from Schulten's play, permitting me to win the queen.

15...Bxe2+ 16.Qxe2 Nxe2 17.Kxe2

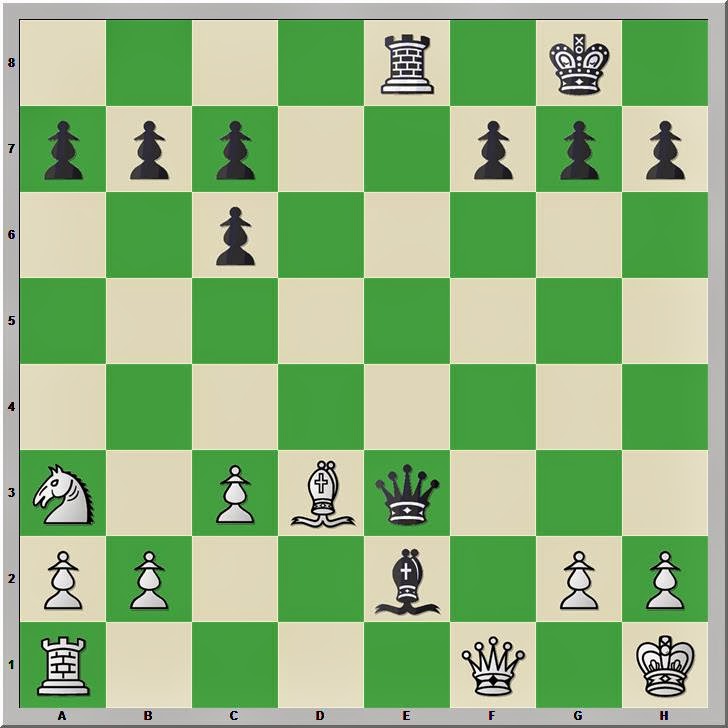
Black to move

According to point count chess, I am ahead two points--queen and knight for a rook, bishop, and two pawns. At the same point in the game, Morphy was materially down a rook and two pawns for two knights. By sacrificing material, Hiarcs has reduced the vulnerability of White's king.

I went on to win the game, but I missed a few instructive tactics that were revealed when I went through my play later that morning with Stockfish.

17...Qe7 18.Kf3 b6 19.Rhe1 Qb7+ 20.Kf2 Qa6 21.Rec1 Re8 22.Kf1 h5 23.h3 Qc8 24.Kf2 Qc5+ 25.Kf3

Black to move

I played 25...h4.

I could have played 25...Ng4! 26.hxg4 hxg4+ 27.Kxg4 Qf2.

In this game, it seems beneficial to be down material because that is how the White king is rendered vulnerable to attack. If White tries to keep the bishop, the king might get mated.

After winning this game, I started anew from one move earlier in the game.

Hiarcs (Schulten) -- Stripes (Morphy)

12...Nxc6 13.Bc3

Hiarcs found an improvement over White's play.

Black to move

I drew the first game, played more aggressively in the second and lost. On the third effort the following morning, I managed to score a victory.

13...Nd4 14.Bxd4 Qxd4

Hiarcs played 15.c3 here in the game that was drawn, but 15.Rc1 in the other two.

After 15.Rc1 Rad8 16.Nf3, we reach the next diagram.

Black to move

Black is still down two pawns while White's forces have hope of completing mobilization.

In the third game, I played 16...Qe3, but Stockfish considers 16...Bxf3 superior by the value of a minor piece.

This exercise demonstrated that I have work to do learning to exploit an initiative after having sacrificed material to achieve it. In the first two games, I regained the sacrificed material but slowly lost my advantage. In one case, the initiative transferred to White and the silicon beast prevailed.

My win came as a result of a combination that gained material superior to the pawns that Morphy had sacrificed.

17.Qd2 Qxd2+ 18Kxd2 Ne4+!

White to move

19.Ke3 Nc3+ 20.Kd2 Nxe2

I have a bishop for the two pawns. Moreover, my pieces are more active than White's.


Materialism

McDonnell -- La Bourdonnais 1834

In game twenty of their first match, Alexander McDonnell sacrificed development for material gain. Louis-Charles Mahé de La Bourdonnais took advantage of this error to launch a decisive attack against White's vulnerable king. McDonnell (1798-1835) was the top player in England in the 1830s. La Bourdonnais (1795-1840) had been France's strongest player for a decade. They met for the match at the Westminster Chess Club in London.

Chess Skills has an ongoing series featuring all of the games in the first match. The series begins with "Three Fighting Draws". My comments on game 19 are in "After a Long Drought ...". My annotations on these games are an element in my own chess training. I am not using chess engines to check my analysis, and make only very limited reference to the work of other commentators.


McDonnell,Alexander -- De Labourdonnais,Louis Charles Mahe [C33]
London m1 London (20), 1834

1.e4 e5 2.f4 exf4 3.Bc4 Qh4+ 4.Kf1 d6 5.d4 Bg4

5...g5 was La Bourdonnais' choice in other games.

6.Qd3

I prefer 6.Nf3.

6...Nc6

White to move

7.Bxf7+?!

Employing a tactic that appears in some of the oldest chess books, McDonnell seizes the opportunity to win a pawn or two.

7.Nf3 might still be worth playing.

7...Kxf7 8.Qb3+ Kg6 9.Qxb7 Nxd4!

Offering the rook may have been a surprising move to the British player.

9...Rc8 10.Qxc6 with a one pawn advantage for White.

10.Qxa8 Nf6

White to move

White has won the exchange, but most of Black's pieces are in play.

11.Na3 f3 12.g3

12.Nxf3 Bxf3 13.gxf3 Qh3+.

12...Bh3+ 13.Ke1

13.Nxh3? Qxh3+ 14.Ke1 Qg2.
13.Kf2 Ng4+ 14.Ke1 f2+.

13...Qg4 14.Be3 d5 15.Qxa7

15.Bxd4 loses the queen. 15...Bb4+ 16.c3 Rxa8.

15...Nc6 16.Qxc7 d4

White to move

17.Bd2

17.Nxh3 does not seem better 17...dxe3 18.Nf4+ Kh6 19.Qxc6 f2+ 20.Kf1 Qf3.
17.Bf2 may hold 17...Qxe4+ 18.Kd1.

17...Qxe4+ 18.Kd1 f2 19.Nxh3 Qf3+ 20.Kc1 Qxh1+ 0–1

McDonnell will win the next game.

Weakened King

McDonnell -- De La Bourdonnais 1834

I have been working through all of the games of Alexander McDonnell (1798-1835). Most of his available games are from his series of matches with Louis-Charles Mahé de La Bourdonnais (1795-1840). Bourdonnais won twice as many as McDonnell. In the first match, McDonnell led after game six. He then lost eleven of the next twelve games.

Chess Skills is following this match through a series of posts that began with "Three Fighting Draws" (30 June 2014).* We are now at game twelve. See "Losing Takes a Toll" for game eleven.

In game after game, it seems that McDonnell makes a small inaccuracy and then finds himself in a much worse position. Such is the case in game twelve.

De Labourdonnais,Louis Charles Mahe -- McDonnell,Alexander [D20]
London m1 London (12), 1834

1.d4 d5 2.c4 dxc4 3.e3 e5 4.Bxc4 exd4 5.exd4 Nf6 6.Nf3 Bd6 7.0–0 0–0 8.Bg5 h6

Testing the resolve of the bishop.

8...Bg4 was possible here as well.

9.Bh4

Black to move

9...g5?!

Weakening the king's position.

9...Bg4 appears in many games today 10.h3 Bxf3 11.Qxf3 g5 12.Bg3 Bxg3 13.Qxg3 Qxd4 14.Qb3 Nc6 15.Rd1 Qc5 16.Qc2 Kg7 and Black won in 63 moves Sergeev,V (2436)--Navara,D (2715) Pardubice 2013

10.Bg3 Bg4

10...Bxg3 is worse 11.fxg3 and White will have pressure along the f-file.

11.Nc3 Nc6

11...Nbd7 might have been sensible.

12.Qd3 Kg7

White's queen threatened to come in to g6, taking advantage of the pin on f7.

13.Ne5 Bxe5 14.dxe5 Nh5

14...Qxd3 is worse 15.exf6+ Kxf6 16.Bxd3+-

15.Nd5

Black to move

White's forces are well-coordinated for attack on the somewhat vulnerable Black king.

15...Nxg3 16.Qxg3 Bh5 17.f4

Black to move

17...Na5 

17...Nd4 may have been the last chance to fight on the kingside, although it leads to elimination of the king's pawn shield.

18.Nf6 Bg6 19.fxg5 Nf5 20.gxh6+ Nxh6 21.Nh5+ Kh8

(21...Kg8 loses quickly 22.Qxg6+ Kh8 23.Qg7#).

18.b3 Nxc4 19.bxc4 c6 20.Nf6 Qd4+ 21.Kh1 Bg6 22.Rad1 Qxc4

White to move

Instead of being down a pawn, McDonnell has a one pawn advantage. However, now all White's pieces are coming after his king. La Bourdonnais demonstrates skill in bringing home the point.

23.f5 Bh7 24.Nd7 Rfd8 25.e6!

Beginners, and even sixteenth century masters, would have played 25.f6+. La Bourdonnais, however, perceives that the battle will conclude when he gains full control of the seventh rank.

In the previous century, François-André Danican Philidor extolled the power of pawns. He advocated arranging the pieces behind them so they are well-supported and then thrusting them forward with decisive results. For Philidor, the pawns were of such importance that he frequently sacrificed the exchange in order to create a pair of pawns with a chance to advance.

Philidor's ideas were not widely accepted by the chess masters of his day. Indeed, it is commonplace among chess historians to assert that Philidor's ideas were largely neglected until the development of modern theory by Wilhelm Steinitz and his contemporaries. If so, it may be fair to say that La Bourdonnais was decades ahead of his time.

La Bourdonnais demonstrates effective pawn play in many of the games in this series of matches. In this game, he shows that a strong pawn on the sixth rank may advance with decisive results when it is supported from the side, rather than the rear as Philidor advocated.

25...f6 26.Qc7

The queen penetrates to the seventh rank

26...Rdc8 27.Qxb7

....and grabs a pawn.

Black to move

27...Qb5

McDonnell will eliminate the pesky queen.

28.Rb1

A rook will replace the queen.

28...Qxb7 29.Rxb7 Kh8

McDonnell's king flees the dangerous seventh rank.

30.Nxf6

Another pawn falls, and Bourdonnas threatens checkmate in one.

30...Bg8

The only move.

31.Rd1

The other rook prepares to occupy the seventh rank

31...Rd8

McDonnell would like to trade rooks.

32.Rdd7 Rxd7 33.Rxd7 g4

33...Rb8 34.Kg1

34.Kg1 a5

White to move

35.e7 1–0

McDonnell's expertise using the bishop pair to overcome a one pawn deficit will put an end to the losing streak in the next game (see "Morning Coffee").

*I am using databases and occasional reference to articles on these games, such as Paul Morphy's series in the New York Ledger (1859). However, I am leaving my chess engines off during my analysis. Consequently, I almost certainly will miss some tactics.

Checkmate Threats

In order to get at my opponent's king, I opening my own to some suffering.

Black to move

41...Ree2!

This position arose in a game played on the Chess By Post iOS app. We had three days per move, but the last ten moves of the game were played over an eight hour span.

My opponent immediately went after my king who looks quite vulnerable.

42.Rc8+ Kg7 43.Bd4+ Kh6 44.Rc6+ Kh5 45.Rxf7

Black to move

My opponent threatens checkmate in one move, but I have several ways to keep my monarch safe.

45...Rxg2+ 46.Kf1 Kh4 47.Rg7

47.Rxh7+ is not dangerous. 47...Kg3 and my king is well sheltered by my opponent's pawn.

47...h5 48.d6 Ba4 49.d7

Black to move

My opponent decides that he needs a queen. Alas, I can now force checkmate in a few moves. My opponent resigned two moves later.

De La Bourdonnais Evens the Score

McDonnell -- De La Bourdonnais 1834

Alexander McDonnell took the lead in game six. In the seventh game of the first match between the Irish player, McDonnell, and the French player, Louis-Charles Mahé de La Bourdonnais, followed game five for five moves (see "McDonnell Strikes Back"). McDonnell was the first to deviate, but La Bourdonnais appears to have been the one who found an improvement.

McDonnell,Alexander -- De Labourdonnais,Louis Charles Mahe [B21]
London m1 London (7), 1834

1.e4 c5 2.f4 e6 3.Nf3 Nc6 4.c3 d5 5.e5 f6

La Bourdonnais played 5...f6 thirteen times. Although the ECO Code and move order makes this game a Sicilian Defense. The character of the game resembles more closely the Advance Variation of the French Defense.

White to move

6.Be2?!

This game was the sole instance with this move. It is not a particularly useful square for the bishop and wastes time.

He had played 6.Na3 in game five and returned to it after this game. Na3 is a common idea in the Advance French. Its purpose is to deploy the knight on c2, where it secures the vulnerability on d4. In the fifth match, he switched to 6.Bd3, which brought him his best results from this opening.

6...Be7 7.Na3 Qb6!

La Bourdonnais would deploy his queen to b6 in every subsequent game that began with the five moves that opened this game. Today, Qb6 remains one of the most popular responses to the Advance Variation by players of the French Defense.

This move against the French had been played by François-André Danican Philidor in a blindfold exhibition in 1794. Philidor lost that game to George Atwood, but not because of his plan in the opening.

8.Nc2 Nh6 9.d4 cxd4 10.cxd4 Bd7

White to move

11.Bd3

I would castle here. McDonnell's move gives the impression that already in this game, he has come to realize that 6.Be2 was an error.

11...Nb4

Black seizes the initiative.

12.Nxb4 Bxb4+ 13.Kf2

White's king often finds security on f2 against the French Defense. However, McDonnell's experience against La Bourdonnais when his king moved e1-f2 was grim: one win, one draw, seven losses.

13...0–0 14.Rf1

Black to move

14...fxe5

Black's pressure along the f-file and along the dark-squared diagonal renders White's game unpleasant.

15.fxe5 Nf5 16.Bxf5 Rxf5 17.Kg1

In subsequent games, McDonnell's king would seek refuge on g3. Of course, the position in this game is unique. Even so, I wonder if that move was worth considering here.

17...Rc8

White to move

18.g4?

Already weak on the dark squares, White creates a decisive vulnerability on f3. This move is a tactical and positional error.

18.a3 Be7 is at least playable, although Black maintains an advantage.

18...Rf7 19.a4?!

Every chess move weakens something. In this case, it is the b3 square. La Bourdonnais will use b3 as a staging point to combine pressure along the f-file with pressure along the third rank.

19...Rcf8 20.Be3 Be7 21.Qe2 Qb3

White to move

How can White secure his position?

22.Bg5!?

McDonnell sets a clever trap.

22...Bb4

22...Bxg5? Nxg5 and White gets activity along the f-file. Exchanging all the rooks gives White a clear advantage with possibilities of checkmate or winning the e6 pawn.

23.Kg2

Perhaps retreating the bishop to d3 was best after La Bourdonnais revealed that he could see through the trap. Now, La Bourdonnais wins with a tactical blow.

23...Rxf3! 24.Rxf3 Rxf3

White to move

25.Rc1

25.Qxf3 Qxb2+ 26.Qf2 Qxa1-+

25...Rf8 26.Rc7 Bc6 27.Be3 Qc4 28.Qd1 Ba5 29.Re7 Bxa4 0–1

Games eight and nine are discussed in "Two Losses."

A Typical and Uncommon Position

Although this position contains several common elements that arise in the French, it appears in only thirteen games in the ChessBase online database. It also cropped up in my second blitz game this morning.

The position arises in the Tarrasch after 1.e4 e6 2.d4 d5 3.Nd2 Nf6 4.e5 Nfd7 5.f4 c5 6.c3 Nc6 7.Ndf3 cxd4 8.cxd4 f6 9.Ne2 Bb4+ 10.Kf2 fxe5 11.fxe5 O-O*

White to move

My opponent played 12.Kg1 and I won the game in 47 moves. He lost a pawn on move 33 and lost a piece to a knight fork on move 44.

Black's immediate target is e5. If it were Black's move, the pawn could be taken as one of the defending knights is pinned. The locked center with targets on d4 and e6 is typical of the French Defense. White's king on f2 is a common maneuver. White's bishops have more scope even though neither has moved.

My opponent stepped out of the pin.

A) 12.Kg3 was played in three games. That was the end of one game--a draw was agreed. It was the only game between masters. 12...Ne7 and 12...Nb6 were played in the other two games.

12...Ndxe5+ has not been tried. 12.Kg3 might be regarded as an error.

B) 12.Be3 was played in three games. All continued 12...Ndxe5 13.dxe5 Nxe5

White to move

Skripchenko -- Maric, New Delhi 2000 continued 14.Qb3 b6 15.Rd1 Qe7 16.Kg1 and was drawn in 42 moves.

14.Bd4 was played in the other two games.

Black won a long battle in Matsura -- Cordova, Sao Paulo 2006 that continued 14...Nc6 15.a3 Bd6.

A draw was reached after a few moves in the more recent Kumaran -- Ram, Chennai 2013: 14...Qh4+ 15.Ng3 Nxf3 16.gxf3 e5 and drawn three moves later. 16...e5 may be inaccurate.

Black certainly has the better game after 12.Be3, which may be regarded as dubious at best.

C) 12.a3 was played in three games.

A correspondence game continued 12...Qh4+ 13.Kg1 Rxf3 14.gxf3 Ndxe5

White to move

White should have been happy to escape this correspondence game with a draw.

12...Ndxe5 was played in the other two games.

Black seems to have found frustration in Popov -- Danin, Smolensk 2005, which continued 13.dxe5 Bc5+ 14.Ke1! Nxe5 15.Nxe5 Bf2+ 16.Kd2 Qg5+ 17.Kc2 Qxe5 18.Kb1

Black to move

After his long journey, the White king appears less vulnerable and White went on to win.

White also survived Black's early attack in Polgar,J -- Hernandez, Merida 2000. That game continued 13.axb4 Qh4+ 14.Kg1 Nxf3+ 15.gxf3 Rxf3 16.Ng3 Nxd4 17.Bg2

Black to move

White went on to win.

Black should have the better game after 12.a3, but in practice has failed to prove it.

D) My opponent's 12.Kg1 may be an error.

However, I missed the thematic 12...Ndxe5. Instead, I tried 12...Qb6. My opponent played 13.Be3

Black to move

13...Ndxe5 remains the correct move. Instead, move-by-move, I squandered my advantage and won only due to tactical errors by my opponent in the ending.

Searching the database for the position in the first diagram produces games where it appears that White should be okay. With optimal play by both sides, however, Black should have a clear advantage. White's pawn center is weak in part due to the vulnerability of the White king.


*Notation leading to the diagram position was added per a request in the comments below.

Vulnerability

Whose king is more secure?

White to move

White's king has an intact pawn shield, while Black's was shattered by White's sacrifice of a knight.

Black's h7 pawn appears to be a target, but Black has the diagonal leading to it blocked with a pawn that is well-defended. White could try to create a battery along the h-file with a rook lift, but Black has the resources to find additional defenders along the seventh rank.

Black's bishop is prepared to take up residence on c6, while his heavy pieces might all find their way to the g-file. With light-squared bishops on the board, the White king will be less secure on h1 than the Black king on h8. The pawn on f5, currently serving a defensive role, may be able to move to f4 should White play g3.

Black has a slight material edge due to White's sacrifice earlier in the game. Black's pieces are better coordinated than White's. Despite superficial appearances relating to Black's shattered pawn shield, his king is more secure. Moreover, Black has a decisive advantage.

The game continued 21.Re3 Ng6 22.Qh6 Qd4 23.Rh3 Qg7

Black's move is the only one that does not lose. 23...Rf7 loses because the h-pawn in pinned. 24.Qxg6+-.

White to move

24.Qe3??

24.Qxg7+ was best 24...Kxg7.

24...f4 25.Qc5

25.Qf3 is better.

25...Bxh3 26.gxh3?

The final error. 26.Qg5 allows White to play on even though his position is irretrievably lost. 26...Be6.

Black to move

26...Nh4+

Black spots the mate in four.

0-1

In Elements of Positional Evaluation: How the Pieces Get Their Power, 4th ed., revised and enlarged (Milford, CT: Russell Enterprises, 2010), Dan Heisman offers vulnerability as a positional element to replace the pseudo-element of king safety. A key element of vulnerability that Heisman addresses is strength of the forces the guard a vulnerable piece.

The king is absolutely vulnerable because he may not be sacrificed. An attack on the king must be met. But, in the illustration above, the Black king's relative vulnerability is low because there are more pieces defending than attacking.

Losing my Virginity with the Ponziani

In the second round of the Collyer Memorial tournament yesterday, I played the Ponziani for the first time in a standard game. My prior experience with the opening had been limited to a few games of online blitz the previous three days, one game against a beginner in a chess class that I teach, and against the winner of Spokane Chess Club's winter championship in Friday's blitz tournament. In that game, I had a nice position but then hung my queen.

I have looked over a few Grandmaster games in the past few days. My interest in the opening was stimulated a year ago when Magnus Carlsen played it against Pentala Harikrishna in the 2013 Tata Steel tournament, and then had the Black side in his game against Hou Yifan. The latter was mentioned on this blog while it was taking place. More recently, I have been looking through the games of Rezső Charousek and spent some time this week looking at a miniature that he lost to Geza Marozcy. Here is that game with a few comments.

Geza Maroczy -- Rudolf Rezso Charousek [C44]
Match Budapest (2), 19.04.1895

1.e4 e5 2.Nf3 Nc6 3.c3 d5 4.Qa4 f6 5.Bb5 Nge7 6.exd5 Qxd5 7.d4 exd4

7...Bd7
7...Bg4

8.cxd4 Bd7 9.Nc3 Qf5 10.0–0 Nc8??

10...0–0–0 11.Be3 a6 12.Be2 g5 13.Qd1 Nd5 14.Nxd5 Qxd5 15.b3 g4 16.Bc4 Qh5 17.Nd2 Bd6 18.g3 f5 19.f4 b5 20.Bd5 Rhe8 21.Re1 Bb4 22.Rc1 Ne7 23.Bh1 Qf7 24.a3 Ba5 25.b4 Bb6 26.Qc2 Nd5 27.Qb3 Be6 28.Bxd5 Bxd5 29.Qc3 Bb7 30.Qb3 Qd7 31.Nf1 Bxd4 32.Red1 Bxe3+ 33.Nxe3 Qe7 34.Nd5 Bxd5 35.Rxd5 Rxd5 36.Qc2 Qe3+ 37.Kh1 Qe4+ 38.Qxe4 Rxe4 39.Rc2 Red4 0–1 Kelling,F -- Gyles,A, Auckland 1914

11.d5 Nb6 12.dxc6 Nxa4 13.cxd7+ Kd8 14.Bxa4 c6 15.Rd1 Bc5 16.Be3 Bb6 17.Rd6 Kc7 18.Rad1 Rad8 19.Bxb6+ 1–0

For the past few days, I have been contemplating deploying the Ponziani in a tournament game. Self-doubt has been a deterrent. Having been pleased with my play in round one, I decided to play it.

Stripes,James (1899) -- Lombardi,George (1429) [C44]
Collyer Memorial Spokane (2), 22.02.2014

1.e4 e5 2.Nf3

I briefly considered 2.f4, which would have been Charousek's move.

2...Nc6 3.c3

I also considered the Spanish and the Italian, both of which I have played in many games over the years.

3...Nf6

Black has several choices, but this move is most popular.

4.d4 Nxe4

I had looked at games with this move, but forget the main lines. I was now completely on my own tactical and positional understanding without any database memory. To be forced to create something new early, and to force one's opponent to do the same is a principal appeal of the Ponziani.

5.d5

I found the main line.

Black to move

5...Nxf2!?

I was busy taking photos of the players for the Spokane Chess Club when my opponent made this astounding move. Returning to my own board, I was certain the move was an error. Nonetheless, my king did become exposed and I had several alternate lines to consider.

6.Kxf2 Bc5+ 7.Be3 Bxe3+ 8.Kxe3

Black to move

My king's position reminds me of a conversation I had the previous evening concerning the Steinitz Gambit, where Steinitz himself marched his king forward to e3 in some King's Gambit games. The prompt was the second game that John Donaldson showed during his lecture. In that game, White's king stepped up to d2 to connect the rooks, then moved to the third rank. Eventually, it took up position on f2 where it helped keep Black's rogue queen trapped.

8...e4 9.dxc6

I spent six minutes on this move (compared to four for the whole game prior). Most of that time was spent contemplating my next move.

9...exf3 10.Qxf3

The materialistic 10.cxd7+ struck me as being a bit too helpful to Black's mobilization. With a vulnerable king, that seemed a foolish course. A computer can work out the tactics and may favor the material gain. I may check this game with an engine after posting these annotations.

10...0–0 11.Bd3 dxc6

White to move

12.Rd1?!

This set-up of a cheap tactic invites trouble. I seemed to be daring my opponent to find a way to skewer my queen to get at the rook. Perhaps Re1 puts the rook on a better square. I also contemplated Nd2.

12...Re8+

Somehow I overlooked this zwischenzug to set up the skewer.

13.Kf2 Qh4+ 14.Kg1 Bg4 15.Qf4

A strong chess player would have found this pin before playing 12.Rd1, and then assessed the consequences of Black's choices.

Black to move 

15...Re1+

15...g5! looked dangerous to me. 16.Bxh7+ Kxh7 17.Qxf7+ Kh8 and I would seriously consider bailing out of this game with a draw.

My opponent chose a forcing line that kept me from burning much clock time contemplating alternatives. It appeared there were none.

16.Rxe1 Qxe1+ 17.Qf1 Qe3+ 18.Kh1 Re8 19.Na3 Be2

My opponent used ten minutes deciding upon this move, and I had already decided to force the queens off the board with the bishops. The clock showed 1:32 remaining for me and 1:06 for my opponent. Our time control was 1:55 for the game plus a five second delay.

White to move

20.Qxe2 Qxe2 21.Bxe2 Rxe2 22.Rb1?

22.Nc4 must be better.

22...b5 23.Kg1 f5

White to move

24.Rd1

My seven minutes on this move was my longest think of the game. I should have spent a few of these minutes on move 22.

24...Kf7

The critical line that I examined was 24...Rxb2 25.Rd8+ Kf7 26.Rd7+ Kf3

The king could consider e8 and e6, too, as I'm not interested in the kingside pawns just yet.

27.Rxc7 Rxa2 28.Rxa7 with the idea of 29.Nxb5 if the rook remains on the a-file.

A version of this line is still possible after 24...Kf7, but is more likely advantageous for White, or so I thought during the game.

25.Rd7+ Re7

My opponent makes my job easier. At this point, my opponent from the previous round stopped by and looked at the game. He smiled because in our postgame analysis, we had played out a variation where I had a knight against a superior number of pawns. He, too, had sacrificed a knight for two pawns and an attack.

26.Rxe7+ Kxe7 27.Nc2

Black to move

27...g5?

Black needed to address the threatened fork with 27...c5 or 27...Kd6.

28.Nd4 Kf6 29.Nxc6 a6 30.Kf2?

The immediate 30.Nb4 was decisive.

30...h5 31.Nb4

Black to move

Another fork is coming.

31...a5 32.Nd5+ 1–0

I am pleased with the result.

Five players finished day one with 3.0 and with my third round bye, I am one of three with 2.5. This morning, I have a stronger opponent.

Exposed King

The first game of the second and longer match between Geza Maroczy and Rezső Charousek was an instructive win by Maroczy. Charousek delayed castling, and then was forced to make a capture with his king. Proceeding to castle by hand, he found his monarch under attack.

The critical position occurred after Charousek's 20...Nd8.

White to move

Understanding Threats

Lesson of the Week

Rezső Charousek (1873-1900) created deep combinations. In this position, his opponent Jakob Wollner has material superiority, but a vulnerable king.

Black to move

How should Black play?

In the game, Wollner played 18...Qg8.

How should White proceed?

Creating Knight Forks

Lesson of the Week

Young chess players this week have a challenging worksheet. The plan is for them to work through these eleven problems with a partner for no more than fifteen minutes. If need be, I give them the answer to the first problem. Number four is on the demonstration board for the purpose of going through it briefly at the end of the fifteen minutes.

A combination is a series of forcing moves that often begins with a sacrifice and that culminates in a gain of material or checkmate. These eleven problems all feature a knight fork that results in a decisive gain of material. In a few problems, the combination leads to simplification of a position where a material advantage is already present.

In most of these eleven, the player to move sacrifices a queen to fork the enemy's queen and king, while other pieces are gained in the process.

White to move (1-8)

1.


2.

3.

4.

5.

6.

7.

8.


Black to move (9-11)

9.

10.

11.


Copyright 2011 Chess 2 Skills is proudly powered by blogger.com